


What are the different fabrics, trims, and hardware used in the dress?
One of Lydia's tasks for today was to measure the repeat in the geometric pattern of the jacquard that is used for the overlays of the dress. This will help us not only in finding a similar fabric for our reproduction, but by identifying the parts of the print it will make it easier for us to measure/diagram the flat pattern of the overlay pieces.
The repeat occurs at 6.25" vertically, and 2.75" horizontally.
Thursday, August 28, 2008
Starting to drape - original size
What would the flat pattern for the dress look like?
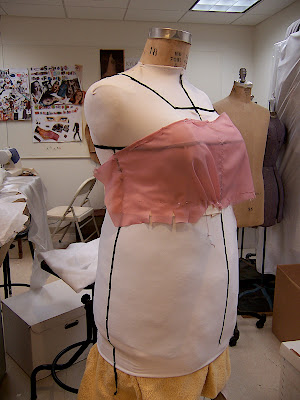
Now that we have an appropriately sized mannequin, we can start working on the original size pattern.
Beginning to drape the original size pattern, with the reproduction size draping in the background.
The first piece to capture is the inner waistband. I thought it would be simple to measure out the placement of darts sewn into this grosgrain ribbon, and I had Emily and Lydia work on measuring that out. It turned out to be much harder than we thought, however, so after they left I took it on myself. The complication is that the darts are not on the straight grain of the ribbon, but at angles. The best solution was to use a modified rub-off technique, and shape a piece of muslin over it to find the exact placement of the darts.
The darts at the side seams imply to me that the dress was made for a slightly larger size, but taken in for our smaller wearer.
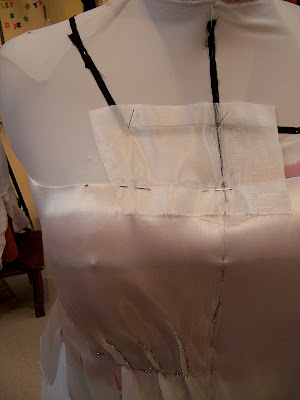
The next pieces are the bodice lining pieces, front and back.
If the top edge seems a little low on the bustline, it's because the proportions of our smaller mannequin are still a little off, since it started as a child's size. We're working not only off the mannequin, but also off of the measurements of the dress itself, which of course are more accurate than the mannequin shape.
Next, I had Lydia skip ahead a layer to measure the lace pieces that go over the shoulders.
I also took a gentle rub-off of the lace inset piece at the top center front of the bodice. Then I took this shape to size up proportionately on my reproduction size.
Meanwhile, Lydia took a rub-off of the shape of the decorative fabric-covered buckle on the back of the overskirt.
To end her workday, I had Lydia transfer some of our completed pattern pieces to paper, using a pounce wheel, pushpins, pencil, ruler, and French curve.
Now that we have an appropriately sized mannequin, we can start working on the original size pattern.
 |
| From Research Process Part 1 - 1910's Franklin Simon gown |
The first piece to capture is the inner waistband. I thought it would be simple to measure out the placement of darts sewn into this grosgrain ribbon, and I had Emily and Lydia work on measuring that out. It turned out to be much harder than we thought, however, so after they left I took it on myself. The complication is that the darts are not on the straight grain of the ribbon, but at angles. The best solution was to use a modified rub-off technique, and shape a piece of muslin over it to find the exact placement of the darts.
 |
| From Research Process Part 1 - 1910's Franklin Simon gown |
The darts at the side seams imply to me that the dress was made for a slightly larger size, but taken in for our smaller wearer.
The next pieces are the bodice lining pieces, front and back.
 |
| From Research Process Part 1 - 1910's Franklin Simon gown |
 |
| From Research Process Part 1 - 1910's Franklin Simon gown |
If the top edge seems a little low on the bustline, it's because the proportions of our smaller mannequin are still a little off, since it started as a child's size. We're working not only off the mannequin, but also off of the measurements of the dress itself, which of course are more accurate than the mannequin shape.
Next, I had Lydia skip ahead a layer to measure the lace pieces that go over the shoulders.
 |
| From Research Process Part 1 - 1910's Franklin Simon gown |
I also took a gentle rub-off of the lace inset piece at the top center front of the bodice. Then I took this shape to size up proportionately on my reproduction size.
 |
| From Research Process Part 1 - 1910's Franklin Simon gown |
Meanwhile, Lydia took a rub-off of the shape of the decorative fabric-covered buckle on the back of the overskirt.
To end her workday, I had Lydia transfer some of our completed pattern pieces to paper, using a pounce wheel, pushpins, pencil, ruler, and French curve.
 |
| From Research Process Part 1 - 1910's Franklin Simon gown |
Wednesday, August 27, 2008
Corset pattern
Today Liz LaBrocca '09 started working on the corset that will be worn under the dress.
We chose a 1911 corset from Norah Waugh's Corsets and Crinolines to reproduce (figure 45, on page 86).
(Waugh, Norah. Corsets and Crinolines. New York: Theatre Arts Books, 1970.)
Liz traced the page onto a transparency, then placed it on an overhead projector to enlarge it.
By moving the projector and adjusting the focus, she was able to adjust the size, measuring key shapes to get them to the overall size desired. Then she traced each piece onto a piece of brown paper taped to the wall.
 |
| From Corset |
 |
| From Corset |
 |
| From Corset |
Small Mannequin
What size person originally wore this dress?
As I've decided my patterning technique will need to include a good deal of draping, I need a better mannequin to drape on than the historic one we took the photos with. I have brought in a child's mannequin which I have shared with Vassar for several years. The proportions are not right at all, but with some padding it will be just fine.
Volunteer Lydia Palmiotti padded the mannequin up to the desired size: 34" bust, 21" waist, 36" hips, full front length 14", nape to waist 12.5". In fact, even this child's mannequin has a waist that is larger than the desired 21" for the original dress, so we will have to drape our pattern slightly larger, then size it back down as a flat pattern.
 |
| From Research Process Part 1 - 1910's Franklin Simon gown |
Monday, August 18, 2008
Starting to drape - reproduction size
What would the flat pattern for the dress look like?
Now that we have a mannequin in the size we want our reproduction to be, I can start working on draping that pattern.
I could have concentrated on the pattern in the original size and graded it up (grading is the process by which you systematically make a pattern bigger), but my concern was that the proportions would be so different in such a different size, and for a modern body, that the pattern would be ill-fitting. Also, this way I can work on the 2 patterns in 2 sizes simultaneously, so perhaps we can get our reproduction done sooner. In fact, I don't even have a mannequin here that is small enough to drape the original size, but I have access to a child's mannequin that I will bring in soon. Working with the 2 different bodies in 3D will be very helpful to figure out the nuances of the pattern pieces.
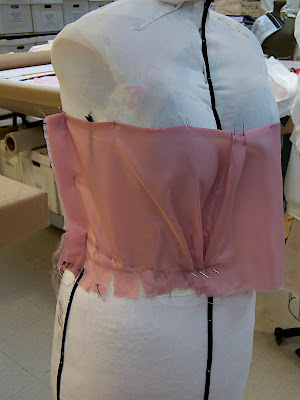
I'll be working from the inside out to drape the dress, layering each piece on top of what's below. So, I've begun with the inner waistband, and then worked on the bodice lining pieces.
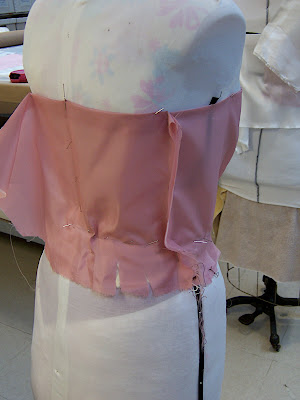
The next layer is what I refer to as the "bodice band" - on the original dress it is a strip of off-white satin with edges finished in such a way that I believe it is simply a very wide satin ribbon. It encircles the whole bodice, with a closure at the center back, and has very little shaping (just a few small pleats at the front).
Now that we have a mannequin in the size we want our reproduction to be, I can start working on draping that pattern.
I could have concentrated on the pattern in the original size and graded it up (grading is the process by which you systematically make a pattern bigger), but my concern was that the proportions would be so different in such a different size, and for a modern body, that the pattern would be ill-fitting. Also, this way I can work on the 2 patterns in 2 sizes simultaneously, so perhaps we can get our reproduction done sooner. In fact, I don't even have a mannequin here that is small enough to drape the original size, but I have access to a child's mannequin that I will bring in soon. Working with the 2 different bodies in 3D will be very helpful to figure out the nuances of the pattern pieces.
I'll be working from the inside out to drape the dress, layering each piece on top of what's below. So, I've begun with the inner waistband, and then worked on the bodice lining pieces.
 |
| From Research Process Part 1 - 1910's Franklin Simon gown |
The next layer is what I refer to as the "bodice band" - on the original dress it is a strip of off-white satin with edges finished in such a way that I believe it is simply a very wide satin ribbon. It encircles the whole bodice, with a closure at the center back, and has very little shaping (just a few small pleats at the front).
 |
| From Research Process Part 1 - 1910's Franklin Simon gown |
 |
| From Research Process Part 1 - 1910's Franklin Simon gown |
Reproduction size
To what size should we reproduce the dress?
The original dress is pretty tiny, so reproducing it in the same size would mean that very few would be able to try it on, which would defeat the purpose of this project. In fact, some costume historians have argued that the reason so many historic clothing objects in museums are so small is not because people were so significantly smaller then, but rather that such small pieces were too small for their owners, and they survived because they weren't worn.
Remember, the goal of this project is "to provide for the construction of new reproduction garments to fit a wider range of sizes." We already have many pieces in our collection of reproductions that represent a middle range of sizes, and some for smaller sizes. While smaller sized participants can still try on larger garments, larger sized participants cannot so easily try on something that is too small. We want our garment to fit a wider range, and in fact we chose a style that could be attractive on a larger figure, but also would look fine whether it fits well or is a bit oversized. The more we can increase the size of our reproduction, the better our chance that no one will be left out of the experience of trying something on.
For that reason, we have chosen to build the dress to a modern women's size 22, with a bust of 51", waist of 44", and hips of 52". When we consult the "Table of Approximate Sizes of Proportionate Measurements of Patterns" from American Dressmaking Step by Step (Coates, Lydia Trattles, as noted in a previous post) we see that this does correspond fairly closely to the largest size in the table. Our modern figure is slightly larger in the waist and smaller in the hips, but that is probably due to the difference in measurements to allow for a corseted waist and ease over the hips.
The next step is to pad a mannequin to fit that size. Lydia carefully added necessary layers to one of our mannequins to make it match the desired size, then covered it with a white spandex cover to smooth out the padding. Finally, she pinned style tape over the cover to re-define the placement of seams.
Now we're ready to start draping!
Original Size
What size person originally wore this dress?
As noted in a previous post, we found our dress to have a waist of about 21"; underbust 25.5"; bust 34.75"; skirt side length 42". But what size was our wearer? To figure that out, we need to think about ease - the areas of the garment that weren't skin tight. The tiny waist was likely tight to the body, and to a corseted body at that. But what about the bust and hips? Certainly there is ease there, but how much?
A little online research helped with this question. I rediscovered a wonderful site, Vintage Sewing.info, which "offers free online access to public domain sewing books" (from their home page). A dressmaking manual from 1917 was helpful:
http://www.vintagesewing.info/1910s/17-ad/ad-04.html#lesson17
(the text would be cited as follows)
Coates, Lydia Trattles. American Dressmaking Step by Step : Containing Complete, Concise, Up-to-Date, and Comprehensible Instruction in Sewing, Dressmaking, and Tailoring : Prepared to Meet the Needs of the Home and Professional Dressmaker and Pupils of this Branch of Domestic Science in our Schools, Colleges, and Universities. New York: Pictorial Review Co., 1917.
The "Table of Approximate Sizes of Proportionate Measurements of Patterns" gives us a context for our lady. The smallest size in the table has a bust of 32", waist of 22", and hips of 36", and skirt side length of 39.5". From what I can tell, that chart does not include any ease for patterning, as the addition of ease is discussed elsewhere in the text. Therefore, our lady is definitely on the small end of the size spectrum, with her waist even slightly smaller, yet she seems to have been slightly taller than average.
All of this points to the dress having been custom made, as opposed to ready-to-wear, but we'll discuss that more in later posts.
Sketches of the Dress
What would the dress have looked like in 3D?
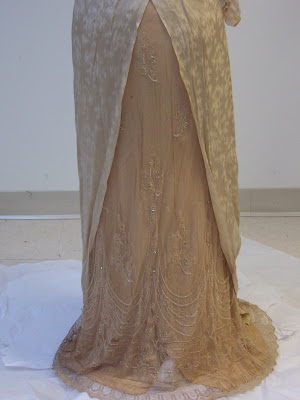
With the dress properly mounted, it provided a wonderful opportunity to record what it is really like in 3 dimensions. Before taking several photos of the dress on the mannequin (shown in a previous post), Lydia made a pencil sketch. Often line drawings are more revealing than photographs, which can be difficult to "read" with all their colors and textures.
With the dress properly mounted, it provided a wonderful opportunity to record what it is really like in 3 dimensions. Before taking several photos of the dress on the mannequin (shown in a previous post), Lydia made a pencil sketch. Often line drawings are more revealing than photographs, which can be difficult to "read" with all their colors and textures.
 |
| From Research Process Part 1 - 1910's Franklin Simon gown |
Steaming and Mounting the Dress
How can we work with this dress without causing it further damage?
Today I had the assistance of the lovely Miss Lydia Palmiotti, a Poughkeepsie area high school student who has offered to volunteer on this project.
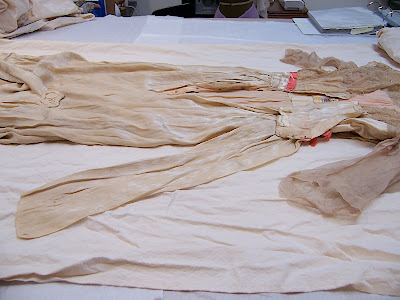
The first thing I asked Lydia to do was to steam the dress. I am hoping that a little steam will help to refresh the fibers of the dress and reduce their brittle nature. With the dress laid out on the table, she carefully inched the steam over the entire dress, working in rows up and down, then over. It is tricky to use the steamer with something flat on the table, as it is designed to work with a hanging garment. She had to keep a careful eye out for condensation on the head of the steamer, and wipe any drips onto a clean white towel before they landed on the garment.
Next Lydia helped to take several basic measurements of the dress, to determine the basic size of the original wearer, and therefore what size mannequin to put it on. Her waist measures about 21"; underbust 25.5"; bust 34.75"; skirt side length 42". This is smaller than any of our commercial dress forms, but luckily we have an alternative. In the mid-90's we mounted a few exhibitions and included several objects that were too small for our dress forms. To show these objects, students helped to build special mannequins to size. We located one such mannequin that was small enough, and brought it into our workspace, then put a slip over it (to protect the dress from the uncovered wood on the mannequin), and laid tissue paper on the floor around the base (to protect the dress from touching the floor).
Then we were ready to mount the dress. While one of us held the bodice of the skirt (by the bust area, as the sleeves are too delicate), the other held the skirt, carefully opening the skirt and putting it over top of the mannequin, then lowering the dress down into place. One problem with our historic mannequins is that they don't have proper shoulders. In this case, the dress was longer waisted than our tiny mannequin, so we had to build up the shoulders with tissue paper for the dress bodice to hang better. Even so, I believe the bodice bloused over the waist sash a little more than it would have for its original wearer. Also, even on this tiny mannequin, it put too much stress on the fabric to hook the original closures at the waist. Instead, I carefully pinned the bodice overlap with fine silk pins. I also pinned the coral trim on the waist sash in a few places that it was torn off and dangling (several of these bits have since come off entirely). After all this, the dress was also a little long for the mannequin, and fanned out on the floor about 2.5". It is likely that the hem hit just above floor length on the original wearer, who must have been about 3" taller than our mannequin.
With the dress properly mounted, it provided a wonderful opportunity to record what it is really like in 3 dimensions. In the next entry you'll find more sketches and photographs of the dress on the mannequin.
Her time in 3D was limited, though. As helpful as it was to see her on the mannequin, it was not safe to expose her to the force of gravity for too long, especially considering the weight of the beadwork on the lace skirt layer. At the end of our workday, I was helped by a Vassar student, Emily Liemkuhler '10, to carefully take the dress off of the mannequin, and put her back in her muslin cover - "tucking her in for the night," as we've come to see it.
Today I had the assistance of the lovely Miss Lydia Palmiotti, a Poughkeepsie area high school student who has offered to volunteer on this project.
The first thing I asked Lydia to do was to steam the dress. I am hoping that a little steam will help to refresh the fibers of the dress and reduce their brittle nature. With the dress laid out on the table, she carefully inched the steam over the entire dress, working in rows up and down, then over. It is tricky to use the steamer with something flat on the table, as it is designed to work with a hanging garment. She had to keep a careful eye out for condensation on the head of the steamer, and wipe any drips onto a clean white towel before they landed on the garment.
Next Lydia helped to take several basic measurements of the dress, to determine the basic size of the original wearer, and therefore what size mannequin to put it on. Her waist measures about 21"; underbust 25.5"; bust 34.75"; skirt side length 42". This is smaller than any of our commercial dress forms, but luckily we have an alternative. In the mid-90's we mounted a few exhibitions and included several objects that were too small for our dress forms. To show these objects, students helped to build special mannequins to size. We located one such mannequin that was small enough, and brought it into our workspace, then put a slip over it (to protect the dress from the uncovered wood on the mannequin), and laid tissue paper on the floor around the base (to protect the dress from touching the floor).
Then we were ready to mount the dress. While one of us held the bodice of the skirt (by the bust area, as the sleeves are too delicate), the other held the skirt, carefully opening the skirt and putting it over top of the mannequin, then lowering the dress down into place. One problem with our historic mannequins is that they don't have proper shoulders. In this case, the dress was longer waisted than our tiny mannequin, so we had to build up the shoulders with tissue paper for the dress bodice to hang better. Even so, I believe the bodice bloused over the waist sash a little more than it would have for its original wearer. Also, even on this tiny mannequin, it put too much stress on the fabric to hook the original closures at the waist. Instead, I carefully pinned the bodice overlap with fine silk pins. I also pinned the coral trim on the waist sash in a few places that it was torn off and dangling (several of these bits have since come off entirely). After all this, the dress was also a little long for the mannequin, and fanned out on the floor about 2.5". It is likely that the hem hit just above floor length on the original wearer, who must have been about 3" taller than our mannequin.
 |
| From 1910's Franklin Simon Gown |
With the dress properly mounted, it provided a wonderful opportunity to record what it is really like in 3 dimensions. In the next entry you'll find more sketches and photographs of the dress on the mannequin.
Her time in 3D was limited, though. As helpful as it was to see her on the mannequin, it was not safe to expose her to the force of gravity for too long, especially considering the weight of the beadwork on the lace skirt layer. At the end of our workday, I was helped by a Vassar student, Emily Liemkuhler '10, to carefully take the dress off of the mannequin, and put her back in her muslin cover - "tucking her in for the night," as we've come to see it.
Friday, August 8, 2008
Patterning Technique
Let's stop for a minute and talk about the choices for how to take a pattern from this dress.
What would the flat pattern for the dress look like?
There are essentially 4 different ways to figure that out.
1. Draping - looking at the lines and shapes of the original and trying to reproduce them by placing fabric on a mannequin of the same size
2. Tracing - laying a section of the garment out flat and tracing its shape onto paper or another fabric
3. Rub-off - placing fabric over each piece and rubbing chalk over it to find the placement of seams, etc.
4. Gridding - after basting thread lines into each piece to mark the grain of the fabric, measuring out from the lines to the seams, etc., (at regular intervals) to find the shape of each piece
Which one is best for this project? There's no right answer, so we're going to use all 4. Each part of the dress will be better served by a different technique. Accuracy is not the only concern. We need to think about which technique will be least invasive, to preserve the original object.
What are the pros and cons for each?
1. Draping - would be the least accurate for an exact reproduction, but would be the least invasive in terms of preserving the original object.
2. Tracing - a little more accurate, and not very invasive, but only will work with very flat, simple sections
3. Rub-off - middle of the road for accuracy, but the most invasive
4. Gridding - would be the most accurate for an exact reproduction, but somewhat invasive, and very time-consuming, requiring a great deal of concentration
Thursday, August 7, 2008
Bibliography
This list will grow as we keep working on this project! Keep checking back.
Works Cited
Arnold, Janet. Patterns of Fashion 2 : Englishwomen's Dresses & their Construction, c.1860-1940. New York: Drama Book, 1977.
Baldt, Laura I. Clothing for Women; Selection, Design, Construction; a Practical Manual for School and Home,. Philadelphia; London: J.B. Lippincott Company, 1916.
Bradfield, Nancy Margetts. Costume in Detail : 1730-1930. New York: Costume & Fashion Press, 1997 (1999 printing).
Butterick Publishing Company. The Dressmaker : A Complete Book on all Matters Connected with Sewing and Dressmaking from the Simplest Stitches to the Cutting, Making Altering, Mending and Caring for the Clothes. New York, NY: Butterick Pub. Co., 1916.
Coates, Lydia Trattles. American Dressmaking Step by Step : Containing Complete, Concise, Up-to-Date, and Comprehensible Instruction in Sewing, Dressmaking, and Tailoring : Prepared to Meet the Needs of the Home and Professional Dressmaker and Pupils of this Branch of Domestic Science in our Schools, Colleges, and Universities. New York: Pictorial Review Co., 1917.
Earnshaw, Pat. The Identification of Lace. Aylesbury, Eng.: Shire Publications, 1980.
Ewing, Elizabeth. Dress and Undress : A History of Women's Underwear. New York: Drama Book Specialists, 1978.
Fagan Affleck, Diane L., and Karen J. Herbaugh. Textiles for Victorian and Edwardian Clothing, 1880-1920 : A Workbook of Swatches and Information. Arlington, Va.: Q Graphics Production Co., 2004.
Franklin Simon and Company. Correct Dress for Women, Misses, Girls, Infants, Men and Boys. Fall and Winter 1916-17. New York:, 1916.
Harris, Kristina, and Home Pattern Company. The Home Pattern Company 1914 Fashions Catalog. New York: Dover Publications, 1995.
Hopkins, J. C., R. L. Shep , and J. C. Hopkins. Edwardian Ladies' Tailoring : The Twentieth Century System of Ladies' Garment Cutting (1910). Mendocino, CA: R.L. Shep, 1990.
Shep, R. L.,. The Great War : Styles and Patterns of the 1910s. Mendocino, CA; Fort Bragg, CA: R.L. Shep ; Distributed by R.L. Shep Publications, 1998.
Toomer, Heather, and Cynthia Voysey. Antique Lace : Identifying Types and Techniques. Atglen, PA: Schiffer Pub., 2001.
Trestain, Eileen Jahnke. Dating Fabrics : A Color Guide, 1800-1960. Paducah, KY: America Quilter's Society, 1998.
Waugh, Norah. Corsets and Crinolines. New York: Theatre Arts Books, 1970.
(bibliography created using RefWorks)
Wednesday, August 6, 2008
First pattern piece
What would the flat pattern for the dress look like?
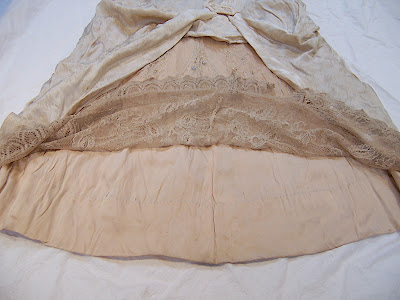
To end my session today, I wanted to capture at least one pattern piece. I decided to start with something really simple (or so I thought): the hem facing at the center front hem of the skirt, which creates a curved slit in the front. I thought this piece was a good candidate to be copied with the rub-off technique, as it was fairly small and flat, but with pronounced edges.
-I started by laying the dress front down,
 |
| From Research Process Part 1 - 1910's Franklin Simon gown |
carefully turning back the lace skirt layer,
 |
| From Research Process Part 1 - 1910's Franklin Simon gown |
and then turning back the back skirt lining to reveal the inside of the front skirt lining.
 |
| From Research Process Part 1 - 1910's Franklin Simon gown |
-Then I began to stitch a basting line to follow the grain of the fabric. Many of the fabrics of this dress have become stretched and misshapen over the years, making it necessary to mark not only the lengthwise grain, but instead an axis that includes the crosswise grain as well. When doing this, they don't form the proper right angle they should, and need to be gently manipulated back into that right angle if the original pattern shape is to be found. I got out my magnifying lamp and settled in to find that grain.
 |
| From Research Process Part 1 - 1910's Franklin Simon gown |
-It wasn't until I started to place these basting lines that I became aware of just how brittle the skirt lining is. Usually the basting does not present a danger to the garment if done delicately with a very fine needle. In this case, however, I found that the insertion of the needle was enough to make the silk shatter, resulting in a small vertical tear. I continued, but very carefully.
-Then I measured the overall size of the pattern piece and cut a piece of washed muslin several inches larger in both directions.
-I measured the placement of my thread basted axis, and marked lines in pencil on the muslin to indicate it.
-I gently placed my muslin over my hem facing, and pinned the pencil lines to the thread basting lines with a few very fine silk pins.
-Next I smoothed the muslin out to the edges of the hem facing piece, pinning them flat around the edges
-With chalk, I was able to rub over the seams and edges of the facing.
-With everything marked, I unpinned the muslin.
-Finally I trued up the lines on the muslin with a pencil, ruler, and French curve.
1 pattern piece completed! (out of 25)
Beginning to pattern
What would the flat pattern for the dress look like?
From Research Process Part 1 - 1910's Franklin Simon gown
I started by making a list of all the different pattern pieces that would be needed to reproduce the gown, from the top down and outside in:
1. bodice shoulder lace pieces (2)
2. center front bodice lace inset
3. sleeve (2)
4. bodice band
4.5. net trim
5. front asymmetrical bodice overlay
5.5 net trim
6. back asymmetrical bodice overlay
6.5. seam binding on back overlay closure
7. front bodice chiffon lining (2)
8. back bodice chiffon lining (2)
9. front bodice lining
10. back bodice lining
11. grosgrain inner waistband
12. seam tape (2)
13. pleated sash
14. sash trim
15. back hanging piece
16. overskirt
17. lace skirt layer (main piece)
17.5. lace skirt layer (smaller piece)
18. back skirt lining (2)
19. front skirt lining
19.5. skirt placket
20. front skirt hem lining facing
As you can see, the more we work with the dress, the more we find things are not as they appeared at first glance. Where pattern pieces are labeled with a .5, they have been added in after we thought the list was done!
This brings us to a grand total of 25 pattern pieces.
Conservation?
From Research Process Part 1 - 1910's Franklin Simon gown
How can we work with this dress without causing it further damage?
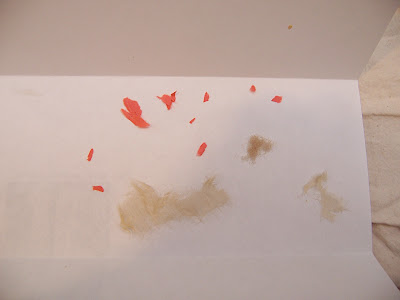
Today I sat down with the dress again to get to know it better. With every step I find more places that the dress is damaged. Small pieces of the deteriorating fabric have fallen off in several places: bits of chiffon and net that lined the lace in the bodice, pieces of the skirt lining, and especially the coral silk trim on the waist sash. Above is a picture of some of the bits.
As I start working on patterning today, I'm concerned that the dress will be hurt by being handled so much. There are some logical tears, such as the top of the front slit of the skirt,but I'm mostly worried about how brittle the fabric is. The skirt lining seems to flake off in your hands. Yet, other layers of fabric are in excellent condition. It's fascinating to see how age affects textiles differently, right next to each other in the same garment. I suspect the silk lining may be a weighted silk, as was common in that period. The metals added to the silk cause it to have a much higher rate of degradation.
Here's a slideshow with some images of the deterioration.
After my work today I've come to 2 conclusions:
-we need to try to humidify the dress with steam to reduce its brittle state
-we need to work on the pattern in a different way than I had originally planned. Rather than working closely with the garment to take exact measurements, we will refer to it with only the gentlest measurement taking, and drape the pattern on a mannequin to check the shape.
Subscribe to:
Posts (Atom)