


Showing posts with label size. Show all posts
Showing posts with label size. Show all posts
Wednesday, September 24, 2008
Mannequin switch
Well, we knew that even the child sized mannequin was slightly too big for our dress, but I thought we could still work with it. Turns out we're doing so much of the patterning by draping now, that it really makes too much of a difference. So, we have returned to the mannequin we used to mount the dress for photographs early in the process. This is still a bit problematic, as this is a mannequin we made ourselves years ago, and it doesn't have much structure. I've added many shoulder pads (it didn't really have defined shoulders to begin with) and stabilized the shape as much as possible. Also, it's shorter than the original, so I still have to remember to account for that.
Wednesday, August 27, 2008
Small Mannequin
What size person originally wore this dress?
As I've decided my patterning technique will need to include a good deal of draping, I need a better mannequin to drape on than the historic one we took the photos with. I have brought in a child's mannequin which I have shared with Vassar for several years. The proportions are not right at all, but with some padding it will be just fine.
Volunteer Lydia Palmiotti padded the mannequin up to the desired size: 34" bust, 21" waist, 36" hips, full front length 14", nape to waist 12.5". In fact, even this child's mannequin has a waist that is larger than the desired 21" for the original dress, so we will have to drape our pattern slightly larger, then size it back down as a flat pattern.
 |
| From Research Process Part 1 - 1910's Franklin Simon gown |
Monday, August 18, 2008
Reproduction size
To what size should we reproduce the dress?
The original dress is pretty tiny, so reproducing it in the same size would mean that very few would be able to try it on, which would defeat the purpose of this project. In fact, some costume historians have argued that the reason so many historic clothing objects in museums are so small is not because people were so significantly smaller then, but rather that such small pieces were too small for their owners, and they survived because they weren't worn.
Remember, the goal of this project is "to provide for the construction of new reproduction garments to fit a wider range of sizes." We already have many pieces in our collection of reproductions that represent a middle range of sizes, and some for smaller sizes. While smaller sized participants can still try on larger garments, larger sized participants cannot so easily try on something that is too small. We want our garment to fit a wider range, and in fact we chose a style that could be attractive on a larger figure, but also would look fine whether it fits well or is a bit oversized. The more we can increase the size of our reproduction, the better our chance that no one will be left out of the experience of trying something on.
For that reason, we have chosen to build the dress to a modern women's size 22, with a bust of 51", waist of 44", and hips of 52". When we consult the "Table of Approximate Sizes of Proportionate Measurements of Patterns" from American Dressmaking Step by Step (Coates, Lydia Trattles, as noted in a previous post) we see that this does correspond fairly closely to the largest size in the table. Our modern figure is slightly larger in the waist and smaller in the hips, but that is probably due to the difference in measurements to allow for a corseted waist and ease over the hips.
The next step is to pad a mannequin to fit that size. Lydia carefully added necessary layers to one of our mannequins to make it match the desired size, then covered it with a white spandex cover to smooth out the padding. Finally, she pinned style tape over the cover to re-define the placement of seams.
Now we're ready to start draping!
Original Size
What size person originally wore this dress?
As noted in a previous post, we found our dress to have a waist of about 21"; underbust 25.5"; bust 34.75"; skirt side length 42". But what size was our wearer? To figure that out, we need to think about ease - the areas of the garment that weren't skin tight. The tiny waist was likely tight to the body, and to a corseted body at that. But what about the bust and hips? Certainly there is ease there, but how much?
A little online research helped with this question. I rediscovered a wonderful site, Vintage Sewing.info, which "offers free online access to public domain sewing books" (from their home page). A dressmaking manual from 1917 was helpful:
http://www.vintagesewing.info/1910s/17-ad/ad-04.html#lesson17
(the text would be cited as follows)
Coates, Lydia Trattles. American Dressmaking Step by Step : Containing Complete, Concise, Up-to-Date, and Comprehensible Instruction in Sewing, Dressmaking, and Tailoring : Prepared to Meet the Needs of the Home and Professional Dressmaker and Pupils of this Branch of Domestic Science in our Schools, Colleges, and Universities. New York: Pictorial Review Co., 1917.
The "Table of Approximate Sizes of Proportionate Measurements of Patterns" gives us a context for our lady. The smallest size in the table has a bust of 32", waist of 22", and hips of 36", and skirt side length of 39.5". From what I can tell, that chart does not include any ease for patterning, as the addition of ease is discussed elsewhere in the text. Therefore, our lady is definitely on the small end of the size spectrum, with her waist even slightly smaller, yet she seems to have been slightly taller than average.
All of this points to the dress having been custom made, as opposed to ready-to-wear, but we'll discuss that more in later posts.
Steaming and Mounting the Dress
How can we work with this dress without causing it further damage?
Today I had the assistance of the lovely Miss Lydia Palmiotti, a Poughkeepsie area high school student who has offered to volunteer on this project.
The first thing I asked Lydia to do was to steam the dress. I am hoping that a little steam will help to refresh the fibers of the dress and reduce their brittle nature. With the dress laid out on the table, she carefully inched the steam over the entire dress, working in rows up and down, then over. It is tricky to use the steamer with something flat on the table, as it is designed to work with a hanging garment. She had to keep a careful eye out for condensation on the head of the steamer, and wipe any drips onto a clean white towel before they landed on the garment.
Next Lydia helped to take several basic measurements of the dress, to determine the basic size of the original wearer, and therefore what size mannequin to put it on. Her waist measures about 21"; underbust 25.5"; bust 34.75"; skirt side length 42". This is smaller than any of our commercial dress forms, but luckily we have an alternative. In the mid-90's we mounted a few exhibitions and included several objects that were too small for our dress forms. To show these objects, students helped to build special mannequins to size. We located one such mannequin that was small enough, and brought it into our workspace, then put a slip over it (to protect the dress from the uncovered wood on the mannequin), and laid tissue paper on the floor around the base (to protect the dress from touching the floor).
Then we were ready to mount the dress. While one of us held the bodice of the skirt (by the bust area, as the sleeves are too delicate), the other held the skirt, carefully opening the skirt and putting it over top of the mannequin, then lowering the dress down into place. One problem with our historic mannequins is that they don't have proper shoulders. In this case, the dress was longer waisted than our tiny mannequin, so we had to build up the shoulders with tissue paper for the dress bodice to hang better. Even so, I believe the bodice bloused over the waist sash a little more than it would have for its original wearer. Also, even on this tiny mannequin, it put too much stress on the fabric to hook the original closures at the waist. Instead, I carefully pinned the bodice overlap with fine silk pins. I also pinned the coral trim on the waist sash in a few places that it was torn off and dangling (several of these bits have since come off entirely). After all this, the dress was also a little long for the mannequin, and fanned out on the floor about 2.5". It is likely that the hem hit just above floor length on the original wearer, who must have been about 3" taller than our mannequin.
With the dress properly mounted, it provided a wonderful opportunity to record what it is really like in 3 dimensions. In the next entry you'll find more sketches and photographs of the dress on the mannequin.
Her time in 3D was limited, though. As helpful as it was to see her on the mannequin, it was not safe to expose her to the force of gravity for too long, especially considering the weight of the beadwork on the lace skirt layer. At the end of our workday, I was helped by a Vassar student, Emily Liemkuhler '10, to carefully take the dress off of the mannequin, and put her back in her muslin cover - "tucking her in for the night," as we've come to see it.
Today I had the assistance of the lovely Miss Lydia Palmiotti, a Poughkeepsie area high school student who has offered to volunteer on this project.
The first thing I asked Lydia to do was to steam the dress. I am hoping that a little steam will help to refresh the fibers of the dress and reduce their brittle nature. With the dress laid out on the table, she carefully inched the steam over the entire dress, working in rows up and down, then over. It is tricky to use the steamer with something flat on the table, as it is designed to work with a hanging garment. She had to keep a careful eye out for condensation on the head of the steamer, and wipe any drips onto a clean white towel before they landed on the garment.
Next Lydia helped to take several basic measurements of the dress, to determine the basic size of the original wearer, and therefore what size mannequin to put it on. Her waist measures about 21"; underbust 25.5"; bust 34.75"; skirt side length 42". This is smaller than any of our commercial dress forms, but luckily we have an alternative. In the mid-90's we mounted a few exhibitions and included several objects that were too small for our dress forms. To show these objects, students helped to build special mannequins to size. We located one such mannequin that was small enough, and brought it into our workspace, then put a slip over it (to protect the dress from the uncovered wood on the mannequin), and laid tissue paper on the floor around the base (to protect the dress from touching the floor).
Then we were ready to mount the dress. While one of us held the bodice of the skirt (by the bust area, as the sleeves are too delicate), the other held the skirt, carefully opening the skirt and putting it over top of the mannequin, then lowering the dress down into place. One problem with our historic mannequins is that they don't have proper shoulders. In this case, the dress was longer waisted than our tiny mannequin, so we had to build up the shoulders with tissue paper for the dress bodice to hang better. Even so, I believe the bodice bloused over the waist sash a little more than it would have for its original wearer. Also, even on this tiny mannequin, it put too much stress on the fabric to hook the original closures at the waist. Instead, I carefully pinned the bodice overlap with fine silk pins. I also pinned the coral trim on the waist sash in a few places that it was torn off and dangling (several of these bits have since come off entirely). After all this, the dress was also a little long for the mannequin, and fanned out on the floor about 2.5". It is likely that the hem hit just above floor length on the original wearer, who must have been about 3" taller than our mannequin.
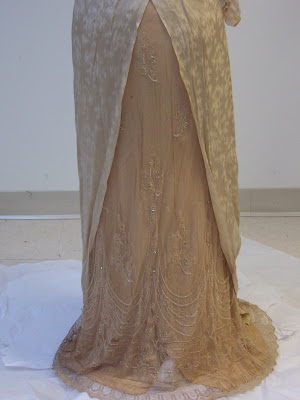 |
| From 1910's Franklin Simon Gown |
With the dress properly mounted, it provided a wonderful opportunity to record what it is really like in 3 dimensions. In the next entry you'll find more sketches and photographs of the dress on the mannequin.
Her time in 3D was limited, though. As helpful as it was to see her on the mannequin, it was not safe to expose her to the force of gravity for too long, especially considering the weight of the beadwork on the lace skirt layer. At the end of our workday, I was helped by a Vassar student, Emily Liemkuhler '10, to carefully take the dress off of the mannequin, and put her back in her muslin cover - "tucking her in for the night," as we've come to see it.
Sunday, July 27, 2008
Questions
The more we work with this dress, the more we want to know about it. As we go, we keep adding to a list of questions we have about the dress and its history, and our objective with this project is to answer as many of them as we can! That way a student who tries on the reproduction can get a detailed picture of the world from which the dress came.
What follows are our questions, in no particular order, followed by a label in parentheses which indicates the category this question falls under. From each blog page, the sidebar on the left has a list of all these categories, kind of like an index. You can use that list to navigate to a particular question that interests you.
Who wore this dress, and for what occasion? (wearer)
What year was the dress made and worn? (period)
What region is the dress from? (region)
Where was it purchased / made? (source)
What underwear would have been worn with this dress? (underwear)
What accessories would have been worn with this dress? (accessories)
Who made this dress, and under what conditions? (production)
Was the dress made to order, or ready to wear, or something in between? (production)
What construction techniques were used to make this dress? (construction)
What would the flat pattern for the dress look like? (pattern)
Has the dress been altered since its original creation? (construction)
How much did this dress cost? (cost)
How much were workers paid to make it? (cost)
What are the different fabrics, trims, and hardware used in the dress? (materials)
Where were they produced, under what conditions, and at what cost? (materials)
Where can we find similar fabrics, trims, and hardware to reproduce the dress? (materials)
How can we work with this dress without causing it further damage? (conservation)
What size person originally wore this dress? (size)
To what size should we reproduce the dress? (size)
What would the dress have looked like in 3D? In motion? (images)
Each of these questions has several "sub-questions," and we will try to address each question in at least one blog post. You can navigate through our blog posts chronologically, or use the "Label" list as an index to go right to the sections that interest you most. If you would like to add any questions, or help propose some answers, please add to the comments below (or on the pages for individual questions).
Subscribe to:
Posts (Atom)