


What would the dress have looked like in 3D?
What would the flat pattern for the dress look like?
Today I finally finished the draping of the original size dress!
(click here if you have trouble viewing the slideshow)
Wednesday, December 10, 2008
Monday, October 27, 2008
Sketch of the Dress
What would the dress have looked like in 3D?
What would the flat pattern for the dress look like?
Here's a sketch of the dress, used to diagram out some of the measurements as part of the patterning process.
What would the flat pattern for the dress look like?
Here's a sketch of the dress, used to diagram out some of the measurements as part of the patterning process.
 |
| From Research Process Part 1 - 1910's Franklin Simon gown |
Wednesday, October 1, 2008
Lace Skirt Pattern - trueing up
What would the flat pattern for the dress look like?
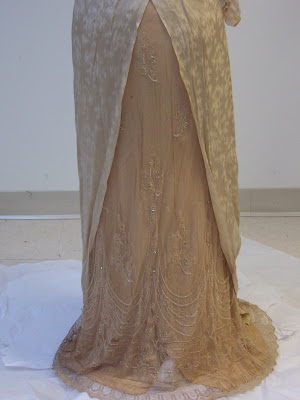
It has taken a few draping sessions, but I think I've finally been able to true up the pieces for the lace skirt.
The pattern Emily made as a rub-off works extremely well. I just had to true up a few lines, straightening out the seams, waistline, and horizontal tuck. However, the process of trueing it up proved somewhat difficult - mainly because the skirt just wouldn't fit on the child-sized mannequin we were using! Our original wearer really was very petite. We had padded the hips of the child-sized mannequin slightly, but even after removing that padding, the mannequin was just too small. So, I switched back to the historic mannequin we used to mount the original dress (see these previous posts labeled with "size"). The mannequin doesn't really have proper shoulders, so I've piled on the shoulder pads to make the upper body a little more realistic, but now the lace skirt portion does seem to work properly.
There are some surprises here. The pattern pieces from the ruboff are rather asymmetrical, but when you get them back on a body they make sense again. I originally thought the horizontal tuck just below the waistline was an alteration to adjust the hem length, but now I see how it actually helps to shape the skirt over the hips.
Wednesday, September 24, 2008
Mannequin switch
Well, we knew that even the child sized mannequin was slightly too big for our dress, but I thought we could still work with it. Turns out we're doing so much of the patterning by draping now, that it really makes too much of a difference. So, we have returned to the mannequin we used to mount the dress for photographs early in the process. This is still a bit problematic, as this is a mannequin we made ourselves years ago, and it doesn't have much structure. I've added many shoulder pads (it didn't really have defined shoulders to begin with) and stabilized the shape as much as possible. Also, it's shorter than the original, so I still have to remember to account for that.
Sunday, September 7, 2008
Tech problems
If you have trouble viewing the images or slideshows, please try a different browser. If you continue to have problems, please leave a comment below - I'll get an email when you do, and then I can try to fix it. Also, please try again later! Sometimes the problem is just temporary and unexplained.
Wednesday, September 3, 2008
Lace Skirt Pattern
Here's an overview of the entire process to get the pattern of the lace skirt layer.
What would the flat pattern for the dress look like?
On August 18, Emily Leimkuhler (VC '10) began working on patterning the lace skirt layer. She started by measuring the hem circumference. In the process, whereas I had thought that the lace skirt was in one piece with one seam, she found an additional seam very cleverly hidden in the design of the lace. The skirt is in 2 sections, one of which is 46" wide at the hem; the other is 18.5", for a total hem circumference of 64.5". The main seam is a French seam at the center back, but the other seam is very well hidden, with the two edges simply overlapped and stitched to carefully follow the pattern of the lace.
Next, she cut, pressed, and blocked a large piece of muslin to prepare to make a rub off of the lace skirt, especially showing the pattern of the beadwork.
She also began basting a "grainline" into the lace - identifying a vertical pattern in the lace and following it with a thread basting line. This will be used as a landmark point to pin the muslin over and rub off the beadwork design.
Emily's next day working on this was August 27th.
Here Emily was carefully placing muslin over a section of the lace skirt, and pinning it in place to be completely smooth. It was very delicate, time-consuming work.
Once the muslin was all in place, she was able to carefully run a piece of chalk over it, registering not only the design of the beaded lace underneath, but also the shape of the pattern piece, and placement of seams, for the lace skirt.
Once all the pieces were rubbed-off, we were able to lay out the flat pieces on the table and true them up, pinning them edge to edge at one of the seams.
As Emily's rub-off process couldn't easily reach up to the waistline of the dress, the upper edge at this stage was still somewhat unknown. We solved that by using the gridding technique to measure out the shape of the upper edge, including the horizontal tuck that falls just below the waistline (hidden by the overskirt). Emily drew some gridlines onto the muslin, along the waistline. Then we used landmarks in the embroidered lace (as noted in the rub-off), along with the threadlines Emily had previously basted into the lace, to delineate an axis that we could measure out from. As I worked with the original garment, measuring over and up from each landmark point the the next, Emily measured and marked each point on the muslin. The resulting pattern is remarkably accurate.
What would the flat pattern for the dress look like?
On August 18, Emily Leimkuhler (VC '10) began working on patterning the lace skirt layer. She started by measuring the hem circumference. In the process, whereas I had thought that the lace skirt was in one piece with one seam, she found an additional seam very cleverly hidden in the design of the lace. The skirt is in 2 sections, one of which is 46" wide at the hem; the other is 18.5", for a total hem circumference of 64.5". The main seam is a French seam at the center back, but the other seam is very well hidden, with the two edges simply overlapped and stitched to carefully follow the pattern of the lace.
Next, she cut, pressed, and blocked a large piece of muslin to prepare to make a rub off of the lace skirt, especially showing the pattern of the beadwork.
She also began basting a "grainline" into the lace - identifying a vertical pattern in the lace and following it with a thread basting line. This will be used as a landmark point to pin the muslin over and rub off the beadwork design.
Emily's next day working on this was August 27th.
Here Emily was carefully placing muslin over a section of the lace skirt, and pinning it in place to be completely smooth. It was very delicate, time-consuming work.
 |
| From Lace Skirt Rub-off |
Once the muslin was all in place, she was able to carefully run a piece of chalk over it, registering not only the design of the beaded lace underneath, but also the shape of the pattern piece, and placement of seams, for the lace skirt.
 |
| From Lace Skirt Rub-off |
 |
| From Lace Skirt Rub-off |
Once all the pieces were rubbed-off, we were able to lay out the flat pieces on the table and true them up, pinning them edge to edge at one of the seams.
 |
| From Lace Skirt Rub-off |
 |
| From Lace Skirt Rub-off |
 |
| From Lace Skirt Rub-off |
As Emily's rub-off process couldn't easily reach up to the waistline of the dress, the upper edge at this stage was still somewhat unknown. We solved that by using the gridding technique to measure out the shape of the upper edge, including the horizontal tuck that falls just below the waistline (hidden by the overskirt). Emily drew some gridlines onto the muslin, along the waistline. Then we used landmarks in the embroidered lace (as noted in the rub-off), along with the threadlines Emily had previously basted into the lace, to delineate an axis that we could measure out from. As I worked with the original garment, measuring over and up from each landmark point the the next, Emily measured and marked each point on the muslin. The resulting pattern is remarkably accurate.
 |
| From Lace Skirt Rub-off |
Tuesday, September 2, 2008
Shoulder Lace Pieces
Today we worked on the pattern of the shoulder lace pieces, which were easy to pattern by simple measurements, since they are essentially based off a rectangle, with angled ends as they attach to the bodice.
Translating into the enhanced size figure is trickier, though - if we were to use lace of the same width as the original (8.75" wide) then the fit over the bust falls differently, and doesn't come as close to meeting on the sides.
Taking into account the different proportions, it might be helpful to find a slightly wider lace - but if not, we just have to take this into account in terms of where the lines fall.
Thursday, August 28, 2008
Repeat in Jacquard
What are the different fabrics, trims, and hardware used in the dress?
One of Lydia's tasks for today was to measure the repeat in the geometric pattern of the jacquard that is used for the overlays of the dress. This will help us not only in finding a similar fabric for our reproduction, but by identifying the parts of the print it will make it easier for us to measure/diagram the flat pattern of the overlay pieces.
The repeat occurs at 6.25" vertically, and 2.75" horizontally.
Starting to drape - original size
What would the flat pattern for the dress look like?
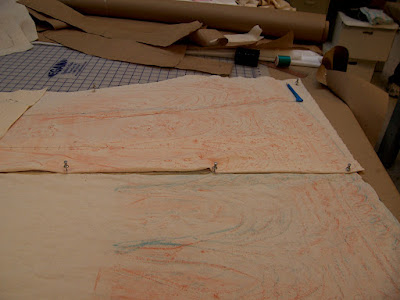
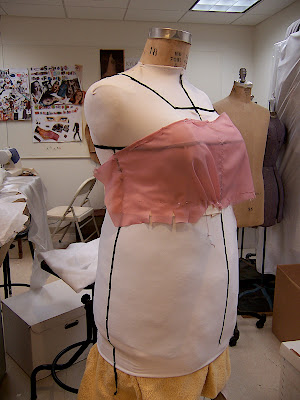
Now that we have an appropriately sized mannequin, we can start working on the original size pattern.
Beginning to drape the original size pattern, with the reproduction size draping in the background.
The first piece to capture is the inner waistband. I thought it would be simple to measure out the placement of darts sewn into this grosgrain ribbon, and I had Emily and Lydia work on measuring that out. It turned out to be much harder than we thought, however, so after they left I took it on myself. The complication is that the darts are not on the straight grain of the ribbon, but at angles. The best solution was to use a modified rub-off technique, and shape a piece of muslin over it to find the exact placement of the darts.
The darts at the side seams imply to me that the dress was made for a slightly larger size, but taken in for our smaller wearer.
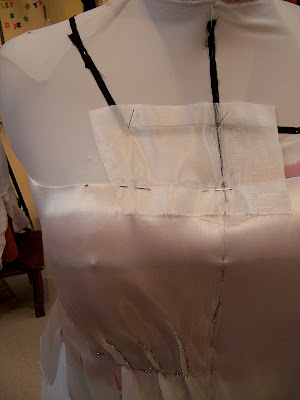
The next pieces are the bodice lining pieces, front and back.
If the top edge seems a little low on the bustline, it's because the proportions of our smaller mannequin are still a little off, since it started as a child's size. We're working not only off the mannequin, but also off of the measurements of the dress itself, which of course are more accurate than the mannequin shape.
Next, I had Lydia skip ahead a layer to measure the lace pieces that go over the shoulders.
I also took a gentle rub-off of the lace inset piece at the top center front of the bodice. Then I took this shape to size up proportionately on my reproduction size.
Meanwhile, Lydia took a rub-off of the shape of the decorative fabric-covered buckle on the back of the overskirt.
To end her workday, I had Lydia transfer some of our completed pattern pieces to paper, using a pounce wheel, pushpins, pencil, ruler, and French curve.
Now that we have an appropriately sized mannequin, we can start working on the original size pattern.
 |
| From Research Process Part 1 - 1910's Franklin Simon gown |
The first piece to capture is the inner waistband. I thought it would be simple to measure out the placement of darts sewn into this grosgrain ribbon, and I had Emily and Lydia work on measuring that out. It turned out to be much harder than we thought, however, so after they left I took it on myself. The complication is that the darts are not on the straight grain of the ribbon, but at angles. The best solution was to use a modified rub-off technique, and shape a piece of muslin over it to find the exact placement of the darts.
 |
| From Research Process Part 1 - 1910's Franklin Simon gown |
The darts at the side seams imply to me that the dress was made for a slightly larger size, but taken in for our smaller wearer.
The next pieces are the bodice lining pieces, front and back.
 |
| From Research Process Part 1 - 1910's Franklin Simon gown |
 |
| From Research Process Part 1 - 1910's Franklin Simon gown |
If the top edge seems a little low on the bustline, it's because the proportions of our smaller mannequin are still a little off, since it started as a child's size. We're working not only off the mannequin, but also off of the measurements of the dress itself, which of course are more accurate than the mannequin shape.
Next, I had Lydia skip ahead a layer to measure the lace pieces that go over the shoulders.
 |
| From Research Process Part 1 - 1910's Franklin Simon gown |
I also took a gentle rub-off of the lace inset piece at the top center front of the bodice. Then I took this shape to size up proportionately on my reproduction size.
 |
| From Research Process Part 1 - 1910's Franklin Simon gown |
Meanwhile, Lydia took a rub-off of the shape of the decorative fabric-covered buckle on the back of the overskirt.
To end her workday, I had Lydia transfer some of our completed pattern pieces to paper, using a pounce wheel, pushpins, pencil, ruler, and French curve.
 |
| From Research Process Part 1 - 1910's Franklin Simon gown |
Wednesday, August 27, 2008
Corset pattern
Today Liz LaBrocca '09 started working on the corset that will be worn under the dress.
We chose a 1911 corset from Norah Waugh's Corsets and Crinolines to reproduce (figure 45, on page 86).
(Waugh, Norah. Corsets and Crinolines. New York: Theatre Arts Books, 1970.)
Liz traced the page onto a transparency, then placed it on an overhead projector to enlarge it.
By moving the projector and adjusting the focus, she was able to adjust the size, measuring key shapes to get them to the overall size desired. Then she traced each piece onto a piece of brown paper taped to the wall.
 |
| From Corset |
 |
| From Corset |
 |
| From Corset |
Small Mannequin
What size person originally wore this dress?
As I've decided my patterning technique will need to include a good deal of draping, I need a better mannequin to drape on than the historic one we took the photos with. I have brought in a child's mannequin which I have shared with Vassar for several years. The proportions are not right at all, but with some padding it will be just fine.
Volunteer Lydia Palmiotti padded the mannequin up to the desired size: 34" bust, 21" waist, 36" hips, full front length 14", nape to waist 12.5". In fact, even this child's mannequin has a waist that is larger than the desired 21" for the original dress, so we will have to drape our pattern slightly larger, then size it back down as a flat pattern.
 |
| From Research Process Part 1 - 1910's Franklin Simon gown |
Monday, August 18, 2008
Starting to drape - reproduction size
What would the flat pattern for the dress look like?
Now that we have a mannequin in the size we want our reproduction to be, I can start working on draping that pattern.
I could have concentrated on the pattern in the original size and graded it up (grading is the process by which you systematically make a pattern bigger), but my concern was that the proportions would be so different in such a different size, and for a modern body, that the pattern would be ill-fitting. Also, this way I can work on the 2 patterns in 2 sizes simultaneously, so perhaps we can get our reproduction done sooner. In fact, I don't even have a mannequin here that is small enough to drape the original size, but I have access to a child's mannequin that I will bring in soon. Working with the 2 different bodies in 3D will be very helpful to figure out the nuances of the pattern pieces.
I'll be working from the inside out to drape the dress, layering each piece on top of what's below. So, I've begun with the inner waistband, and then worked on the bodice lining pieces.
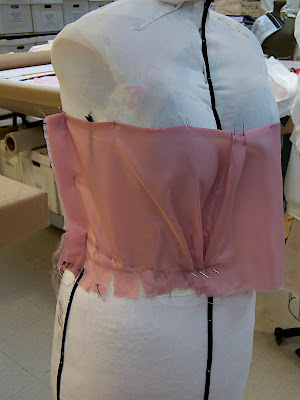
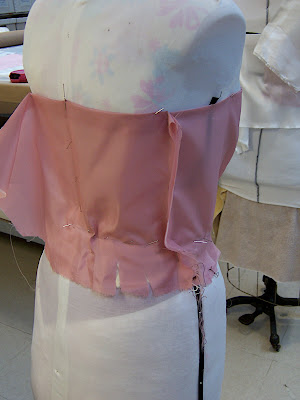
The next layer is what I refer to as the "bodice band" - on the original dress it is a strip of off-white satin with edges finished in such a way that I believe it is simply a very wide satin ribbon. It encircles the whole bodice, with a closure at the center back, and has very little shaping (just a few small pleats at the front).
Now that we have a mannequin in the size we want our reproduction to be, I can start working on draping that pattern.
I could have concentrated on the pattern in the original size and graded it up (grading is the process by which you systematically make a pattern bigger), but my concern was that the proportions would be so different in such a different size, and for a modern body, that the pattern would be ill-fitting. Also, this way I can work on the 2 patterns in 2 sizes simultaneously, so perhaps we can get our reproduction done sooner. In fact, I don't even have a mannequin here that is small enough to drape the original size, but I have access to a child's mannequin that I will bring in soon. Working with the 2 different bodies in 3D will be very helpful to figure out the nuances of the pattern pieces.
I'll be working from the inside out to drape the dress, layering each piece on top of what's below. So, I've begun with the inner waistband, and then worked on the bodice lining pieces.
 |
| From Research Process Part 1 - 1910's Franklin Simon gown |
The next layer is what I refer to as the "bodice band" - on the original dress it is a strip of off-white satin with edges finished in such a way that I believe it is simply a very wide satin ribbon. It encircles the whole bodice, with a closure at the center back, and has very little shaping (just a few small pleats at the front).
 |
| From Research Process Part 1 - 1910's Franklin Simon gown |
 |
| From Research Process Part 1 - 1910's Franklin Simon gown |
Reproduction size
To what size should we reproduce the dress?
The original dress is pretty tiny, so reproducing it in the same size would mean that very few would be able to try it on, which would defeat the purpose of this project. In fact, some costume historians have argued that the reason so many historic clothing objects in museums are so small is not because people were so significantly smaller then, but rather that such small pieces were too small for their owners, and they survived because they weren't worn.
Remember, the goal of this project is "to provide for the construction of new reproduction garments to fit a wider range of sizes." We already have many pieces in our collection of reproductions that represent a middle range of sizes, and some for smaller sizes. While smaller sized participants can still try on larger garments, larger sized participants cannot so easily try on something that is too small. We want our garment to fit a wider range, and in fact we chose a style that could be attractive on a larger figure, but also would look fine whether it fits well or is a bit oversized. The more we can increase the size of our reproduction, the better our chance that no one will be left out of the experience of trying something on.
For that reason, we have chosen to build the dress to a modern women's size 22, with a bust of 51", waist of 44", and hips of 52". When we consult the "Table of Approximate Sizes of Proportionate Measurements of Patterns" from American Dressmaking Step by Step (Coates, Lydia Trattles, as noted in a previous post) we see that this does correspond fairly closely to the largest size in the table. Our modern figure is slightly larger in the waist and smaller in the hips, but that is probably due to the difference in measurements to allow for a corseted waist and ease over the hips.
The next step is to pad a mannequin to fit that size. Lydia carefully added necessary layers to one of our mannequins to make it match the desired size, then covered it with a white spandex cover to smooth out the padding. Finally, she pinned style tape over the cover to re-define the placement of seams.
Now we're ready to start draping!
Original Size
What size person originally wore this dress?
As noted in a previous post, we found our dress to have a waist of about 21"; underbust 25.5"; bust 34.75"; skirt side length 42". But what size was our wearer? To figure that out, we need to think about ease - the areas of the garment that weren't skin tight. The tiny waist was likely tight to the body, and to a corseted body at that. But what about the bust and hips? Certainly there is ease there, but how much?
A little online research helped with this question. I rediscovered a wonderful site, Vintage Sewing.info, which "offers free online access to public domain sewing books" (from their home page). A dressmaking manual from 1917 was helpful:
http://www.vintagesewing.info/1910s/17-ad/ad-04.html#lesson17
(the text would be cited as follows)
Coates, Lydia Trattles. American Dressmaking Step by Step : Containing Complete, Concise, Up-to-Date, and Comprehensible Instruction in Sewing, Dressmaking, and Tailoring : Prepared to Meet the Needs of the Home and Professional Dressmaker and Pupils of this Branch of Domestic Science in our Schools, Colleges, and Universities. New York: Pictorial Review Co., 1917.
The "Table of Approximate Sizes of Proportionate Measurements of Patterns" gives us a context for our lady. The smallest size in the table has a bust of 32", waist of 22", and hips of 36", and skirt side length of 39.5". From what I can tell, that chart does not include any ease for patterning, as the addition of ease is discussed elsewhere in the text. Therefore, our lady is definitely on the small end of the size spectrum, with her waist even slightly smaller, yet she seems to have been slightly taller than average.
All of this points to the dress having been custom made, as opposed to ready-to-wear, but we'll discuss that more in later posts.
Sketches of the Dress
What would the dress have looked like in 3D?
With the dress properly mounted, it provided a wonderful opportunity to record what it is really like in 3 dimensions. Before taking several photos of the dress on the mannequin (shown in a previous post), Lydia made a pencil sketch. Often line drawings are more revealing than photographs, which can be difficult to "read" with all their colors and textures.
With the dress properly mounted, it provided a wonderful opportunity to record what it is really like in 3 dimensions. Before taking several photos of the dress on the mannequin (shown in a previous post), Lydia made a pencil sketch. Often line drawings are more revealing than photographs, which can be difficult to "read" with all their colors and textures.
 |
| From Research Process Part 1 - 1910's Franklin Simon gown |
Steaming and Mounting the Dress
How can we work with this dress without causing it further damage?
Today I had the assistance of the lovely Miss Lydia Palmiotti, a Poughkeepsie area high school student who has offered to volunteer on this project.
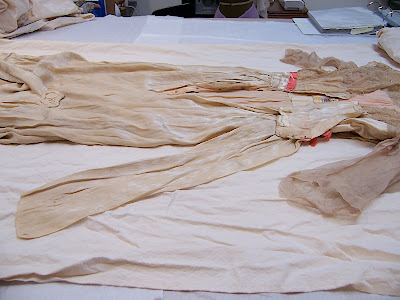
The first thing I asked Lydia to do was to steam the dress. I am hoping that a little steam will help to refresh the fibers of the dress and reduce their brittle nature. With the dress laid out on the table, she carefully inched the steam over the entire dress, working in rows up and down, then over. It is tricky to use the steamer with something flat on the table, as it is designed to work with a hanging garment. She had to keep a careful eye out for condensation on the head of the steamer, and wipe any drips onto a clean white towel before they landed on the garment.
Next Lydia helped to take several basic measurements of the dress, to determine the basic size of the original wearer, and therefore what size mannequin to put it on. Her waist measures about 21"; underbust 25.5"; bust 34.75"; skirt side length 42". This is smaller than any of our commercial dress forms, but luckily we have an alternative. In the mid-90's we mounted a few exhibitions and included several objects that were too small for our dress forms. To show these objects, students helped to build special mannequins to size. We located one such mannequin that was small enough, and brought it into our workspace, then put a slip over it (to protect the dress from the uncovered wood on the mannequin), and laid tissue paper on the floor around the base (to protect the dress from touching the floor).
Then we were ready to mount the dress. While one of us held the bodice of the skirt (by the bust area, as the sleeves are too delicate), the other held the skirt, carefully opening the skirt and putting it over top of the mannequin, then lowering the dress down into place. One problem with our historic mannequins is that they don't have proper shoulders. In this case, the dress was longer waisted than our tiny mannequin, so we had to build up the shoulders with tissue paper for the dress bodice to hang better. Even so, I believe the bodice bloused over the waist sash a little more than it would have for its original wearer. Also, even on this tiny mannequin, it put too much stress on the fabric to hook the original closures at the waist. Instead, I carefully pinned the bodice overlap with fine silk pins. I also pinned the coral trim on the waist sash in a few places that it was torn off and dangling (several of these bits have since come off entirely). After all this, the dress was also a little long for the mannequin, and fanned out on the floor about 2.5". It is likely that the hem hit just above floor length on the original wearer, who must have been about 3" taller than our mannequin.
With the dress properly mounted, it provided a wonderful opportunity to record what it is really like in 3 dimensions. In the next entry you'll find more sketches and photographs of the dress on the mannequin.
Her time in 3D was limited, though. As helpful as it was to see her on the mannequin, it was not safe to expose her to the force of gravity for too long, especially considering the weight of the beadwork on the lace skirt layer. At the end of our workday, I was helped by a Vassar student, Emily Liemkuhler '10, to carefully take the dress off of the mannequin, and put her back in her muslin cover - "tucking her in for the night," as we've come to see it.
Today I had the assistance of the lovely Miss Lydia Palmiotti, a Poughkeepsie area high school student who has offered to volunteer on this project.
The first thing I asked Lydia to do was to steam the dress. I am hoping that a little steam will help to refresh the fibers of the dress and reduce their brittle nature. With the dress laid out on the table, she carefully inched the steam over the entire dress, working in rows up and down, then over. It is tricky to use the steamer with something flat on the table, as it is designed to work with a hanging garment. She had to keep a careful eye out for condensation on the head of the steamer, and wipe any drips onto a clean white towel before they landed on the garment.
Next Lydia helped to take several basic measurements of the dress, to determine the basic size of the original wearer, and therefore what size mannequin to put it on. Her waist measures about 21"; underbust 25.5"; bust 34.75"; skirt side length 42". This is smaller than any of our commercial dress forms, but luckily we have an alternative. In the mid-90's we mounted a few exhibitions and included several objects that were too small for our dress forms. To show these objects, students helped to build special mannequins to size. We located one such mannequin that was small enough, and brought it into our workspace, then put a slip over it (to protect the dress from the uncovered wood on the mannequin), and laid tissue paper on the floor around the base (to protect the dress from touching the floor).
Then we were ready to mount the dress. While one of us held the bodice of the skirt (by the bust area, as the sleeves are too delicate), the other held the skirt, carefully opening the skirt and putting it over top of the mannequin, then lowering the dress down into place. One problem with our historic mannequins is that they don't have proper shoulders. In this case, the dress was longer waisted than our tiny mannequin, so we had to build up the shoulders with tissue paper for the dress bodice to hang better. Even so, I believe the bodice bloused over the waist sash a little more than it would have for its original wearer. Also, even on this tiny mannequin, it put too much stress on the fabric to hook the original closures at the waist. Instead, I carefully pinned the bodice overlap with fine silk pins. I also pinned the coral trim on the waist sash in a few places that it was torn off and dangling (several of these bits have since come off entirely). After all this, the dress was also a little long for the mannequin, and fanned out on the floor about 2.5". It is likely that the hem hit just above floor length on the original wearer, who must have been about 3" taller than our mannequin.
 |
| From 1910's Franklin Simon Gown |
With the dress properly mounted, it provided a wonderful opportunity to record what it is really like in 3 dimensions. In the next entry you'll find more sketches and photographs of the dress on the mannequin.
Her time in 3D was limited, though. As helpful as it was to see her on the mannequin, it was not safe to expose her to the force of gravity for too long, especially considering the weight of the beadwork on the lace skirt layer. At the end of our workday, I was helped by a Vassar student, Emily Liemkuhler '10, to carefully take the dress off of the mannequin, and put her back in her muslin cover - "tucking her in for the night," as we've come to see it.
Friday, August 8, 2008
Patterning Technique
Let's stop for a minute and talk about the choices for how to take a pattern from this dress.
What would the flat pattern for the dress look like?
There are essentially 4 different ways to figure that out.
1. Draping - looking at the lines and shapes of the original and trying to reproduce them by placing fabric on a mannequin of the same size
2. Tracing - laying a section of the garment out flat and tracing its shape onto paper or another fabric
3. Rub-off - placing fabric over each piece and rubbing chalk over it to find the placement of seams, etc.
4. Gridding - after basting thread lines into each piece to mark the grain of the fabric, measuring out from the lines to the seams, etc., (at regular intervals) to find the shape of each piece
Which one is best for this project? There's no right answer, so we're going to use all 4. Each part of the dress will be better served by a different technique. Accuracy is not the only concern. We need to think about which technique will be least invasive, to preserve the original object.
What are the pros and cons for each?
1. Draping - would be the least accurate for an exact reproduction, but would be the least invasive in terms of preserving the original object.
2. Tracing - a little more accurate, and not very invasive, but only will work with very flat, simple sections
3. Rub-off - middle of the road for accuracy, but the most invasive
4. Gridding - would be the most accurate for an exact reproduction, but somewhat invasive, and very time-consuming, requiring a great deal of concentration
Thursday, August 7, 2008
Bibliography
This list will grow as we keep working on this project! Keep checking back.
Works Cited
Arnold, Janet. Patterns of Fashion 2 : Englishwomen's Dresses & their Construction, c.1860-1940. New York: Drama Book, 1977.
Baldt, Laura I. Clothing for Women; Selection, Design, Construction; a Practical Manual for School and Home,. Philadelphia; London: J.B. Lippincott Company, 1916.
Bradfield, Nancy Margetts. Costume in Detail : 1730-1930. New York: Costume & Fashion Press, 1997 (1999 printing).
Butterick Publishing Company. The Dressmaker : A Complete Book on all Matters Connected with Sewing and Dressmaking from the Simplest Stitches to the Cutting, Making Altering, Mending and Caring for the Clothes. New York, NY: Butterick Pub. Co., 1916.
Coates, Lydia Trattles. American Dressmaking Step by Step : Containing Complete, Concise, Up-to-Date, and Comprehensible Instruction in Sewing, Dressmaking, and Tailoring : Prepared to Meet the Needs of the Home and Professional Dressmaker and Pupils of this Branch of Domestic Science in our Schools, Colleges, and Universities. New York: Pictorial Review Co., 1917.
Earnshaw, Pat. The Identification of Lace. Aylesbury, Eng.: Shire Publications, 1980.
Ewing, Elizabeth. Dress and Undress : A History of Women's Underwear. New York: Drama Book Specialists, 1978.
Fagan Affleck, Diane L., and Karen J. Herbaugh. Textiles for Victorian and Edwardian Clothing, 1880-1920 : A Workbook of Swatches and Information. Arlington, Va.: Q Graphics Production Co., 2004.
Franklin Simon and Company. Correct Dress for Women, Misses, Girls, Infants, Men and Boys. Fall and Winter 1916-17. New York:, 1916.
Harris, Kristina, and Home Pattern Company. The Home Pattern Company 1914 Fashions Catalog. New York: Dover Publications, 1995.
Hopkins, J. C., R. L. Shep , and J. C. Hopkins. Edwardian Ladies' Tailoring : The Twentieth Century System of Ladies' Garment Cutting (1910). Mendocino, CA: R.L. Shep, 1990.
Shep, R. L.,. The Great War : Styles and Patterns of the 1910s. Mendocino, CA; Fort Bragg, CA: R.L. Shep ; Distributed by R.L. Shep Publications, 1998.
Toomer, Heather, and Cynthia Voysey. Antique Lace : Identifying Types and Techniques. Atglen, PA: Schiffer Pub., 2001.
Trestain, Eileen Jahnke. Dating Fabrics : A Color Guide, 1800-1960. Paducah, KY: America Quilter's Society, 1998.
Waugh, Norah. Corsets and Crinolines. New York: Theatre Arts Books, 1970.
(bibliography created using RefWorks)
Wednesday, August 6, 2008
First pattern piece
What would the flat pattern for the dress look like?
To end my session today, I wanted to capture at least one pattern piece. I decided to start with something really simple (or so I thought): the hem facing at the center front hem of the skirt, which creates a curved slit in the front. I thought this piece was a good candidate to be copied with the rub-off technique, as it was fairly small and flat, but with pronounced edges.
-I started by laying the dress front down,
 |
| From Research Process Part 1 - 1910's Franklin Simon gown |
carefully turning back the lace skirt layer,
 |
| From Research Process Part 1 - 1910's Franklin Simon gown |
and then turning back the back skirt lining to reveal the inside of the front skirt lining.
 |
| From Research Process Part 1 - 1910's Franklin Simon gown |
-Then I began to stitch a basting line to follow the grain of the fabric. Many of the fabrics of this dress have become stretched and misshapen over the years, making it necessary to mark not only the lengthwise grain, but instead an axis that includes the crosswise grain as well. When doing this, they don't form the proper right angle they should, and need to be gently manipulated back into that right angle if the original pattern shape is to be found. I got out my magnifying lamp and settled in to find that grain.
 |
| From Research Process Part 1 - 1910's Franklin Simon gown |
-It wasn't until I started to place these basting lines that I became aware of just how brittle the skirt lining is. Usually the basting does not present a danger to the garment if done delicately with a very fine needle. In this case, however, I found that the insertion of the needle was enough to make the silk shatter, resulting in a small vertical tear. I continued, but very carefully.
-Then I measured the overall size of the pattern piece and cut a piece of washed muslin several inches larger in both directions.
-I measured the placement of my thread basted axis, and marked lines in pencil on the muslin to indicate it.
-I gently placed my muslin over my hem facing, and pinned the pencil lines to the thread basting lines with a few very fine silk pins.
-Next I smoothed the muslin out to the edges of the hem facing piece, pinning them flat around the edges
-With chalk, I was able to rub over the seams and edges of the facing.
-With everything marked, I unpinned the muslin.
-Finally I trued up the lines on the muslin with a pencil, ruler, and French curve.
1 pattern piece completed! (out of 25)
Beginning to pattern
What would the flat pattern for the dress look like?
From Research Process Part 1 - 1910's Franklin Simon gown
I started by making a list of all the different pattern pieces that would be needed to reproduce the gown, from the top down and outside in:
1. bodice shoulder lace pieces (2)
2. center front bodice lace inset
3. sleeve (2)
4. bodice band
4.5. net trim
5. front asymmetrical bodice overlay
5.5 net trim
6. back asymmetrical bodice overlay
6.5. seam binding on back overlay closure
7. front bodice chiffon lining (2)
8. back bodice chiffon lining (2)
9. front bodice lining
10. back bodice lining
11. grosgrain inner waistband
12. seam tape (2)
13. pleated sash
14. sash trim
15. back hanging piece
16. overskirt
17. lace skirt layer (main piece)
17.5. lace skirt layer (smaller piece)
18. back skirt lining (2)
19. front skirt lining
19.5. skirt placket
20. front skirt hem lining facing
As you can see, the more we work with the dress, the more we find things are not as they appeared at first glance. Where pattern pieces are labeled with a .5, they have been added in after we thought the list was done!
This brings us to a grand total of 25 pattern pieces.
Conservation?
From Research Process Part 1 - 1910's Franklin Simon gown
How can we work with this dress without causing it further damage?
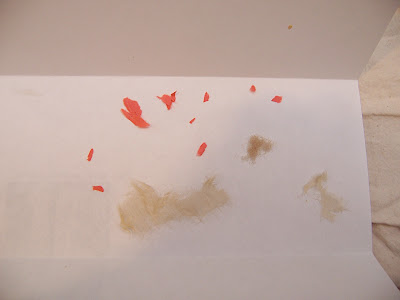
Today I sat down with the dress again to get to know it better. With every step I find more places that the dress is damaged. Small pieces of the deteriorating fabric have fallen off in several places: bits of chiffon and net that lined the lace in the bodice, pieces of the skirt lining, and especially the coral silk trim on the waist sash. Above is a picture of some of the bits.
As I start working on patterning today, I'm concerned that the dress will be hurt by being handled so much. There are some logical tears, such as the top of the front slit of the skirt,but I'm mostly worried about how brittle the fabric is. The skirt lining seems to flake off in your hands. Yet, other layers of fabric are in excellent condition. It's fascinating to see how age affects textiles differently, right next to each other in the same garment. I suspect the silk lining may be a weighted silk, as was common in that period. The metals added to the silk cause it to have a much higher rate of degradation.
Here's a slideshow with some images of the deterioration.
After my work today I've come to 2 conclusions:
-we need to try to humidify the dress with steam to reduce its brittle state
-we need to work on the pattern in a different way than I had originally planned. Rather than working closely with the garment to take exact measurements, we will refer to it with only the gentlest measurement taking, and drape the pattern on a mannequin to check the shape.
Tuesday, July 29, 2008
List of materials
Next, it's time to get intimate with the dress. I really need to know it inside out if I'm going to find answers to the questions we are posing. I started today by taking lots of notes about each part of the dress.
 What are the different fabrics, trims, and hardware used in the dress?
Starting at the top of the dress and working down, I tried to identify each different material used in the dress, including both soft goods and hardware. One of the wonderful aspects of this period, the 1910's, is that while the silhouette is fairly simple, there is a rich layering of materials that adds incredible detail to the garment. But after my notes from this day, my total still wasn't complete - as Emily Leimkuhler (VC '10) and Liz Labrocca (VC '09) have been working with me on this project, they have pointed out materials that didn't make it on my list! After their input, the total is now up to 15 different soft goods and 8 different types of hardware:
-2 different peach/tan silk linings (slightly different shade from bodice to skirt)
-tan lace yardage with beading (middle skirt layer)
-tan lace trim, 8.75" wide (over the shoulders of the bodice, and filling in the neck)
-tan silk jacquard with geometric, pixelated pattern (overskirt, asymmetrical bodice overpieces, hanging piece in back)
-4" wide off white grosgrain ribbon (inner waistband)
-metallic organza - off-white/golden (pleated sash)
-coral silk (sash trim)
-off-white silk chiffon (lining of lace)
-off-white silk voile (lining of asymmetrical bodice overpieces)
-off-white satin (band that forms middle layer of bodice)
-off-white net edging (pleated trim at top edge of bodice)
-tan net (lining center front inset in bodice)
-2 widths and qualities of off white seam binding
-gold beads
-white beads
-rhinestones
-buckle (decorative, covered in self fabric)
-3 different sizes of hooks: 3/16" (overlapping sash, meet with thread chain loops), 1/4" (bodice closure, meet matching bars on satin bodice) , 3/8" (inner waistband closure, meet matching eyes)
-1/4" snaps (skirt placket)
Here's a slideshow of some of the materials:
Alterations?
Has the dress been altered since its original creation?
 |
| From Research Process Part 1 - 1910's Franklin Simon gown |
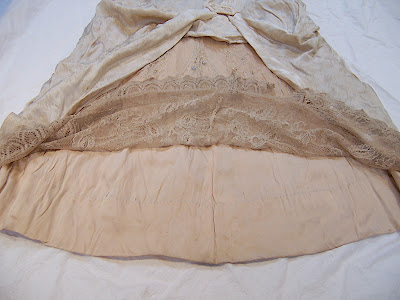
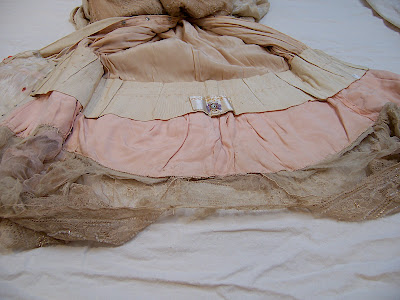
There is a tuck in the lace layer of the skirt, just below the waist level, all the way around, which is hidden by the jacquard overlay. It is not quite even all the way around. Was it original on the dress, providing some sort of shaping to the skirt? Or is it a later alteration?
One other detail suggests that it might be an alteration: on the snap closure placket at the center back of the skirt, the lace layer sits higher than the lining layer. The lining could easily have been re-hemmed right at the bottom to adjust the length, but the lace, with its border design and beading, would have to have been raised at the waist (and is conveniently covered by the overskirt).
Another detail I've considered is the nature of the beading. The beadwork continues up the length of the lace skirt, even though much of it is covered by the overskirt. I thought this also might be an argument for an alteration, but in fact I now think it just indicates that the lace was beaded as yardage before being cut into the skirt.
Was the dress made to order, or ready to wear, or something in between?
Another option exists, somewhere in the middle - that the dress was in the middle of the spectrum between ready-to-wear and made-to-order, so that parts of the dress (inner waistband, lining, skirt) and were already made, but then altered for the specific wearer, whereas other parts (sash, overlays) were applied for the specific wearer. Then it would make sense that the skirt length was altered, even for its original wearer (not unlike a modern bridesmaid's dress).
First Steps
 |
| From Research Process Part 1 - 1910's Franklin Simon gown |
How can we work with this dress without causing it further damage?
To begin our work with the dress today, first I needed to think about conservation and create a safe space to work with it:
-measured the overall length and width of the dress as it lays in the box /on the table
-cut a piece of washed muslin almost 3X the length of the dress, and finish the raw edges of it (this will serve as a cover/sling to protect the dress as we work on it)
-with the muslin laid out on the table, I brought the dress over from the storage area and laid it out carefully on top of the center of the muslin (when the dress is not being studied, it can be covered up by overlapping the long sides of the muslin over top of it)
Sunday, July 27, 2008
Questions
The more we work with this dress, the more we want to know about it. As we go, we keep adding to a list of questions we have about the dress and its history, and our objective with this project is to answer as many of them as we can! That way a student who tries on the reproduction can get a detailed picture of the world from which the dress came.
What follows are our questions, in no particular order, followed by a label in parentheses which indicates the category this question falls under. From each blog page, the sidebar on the left has a list of all these categories, kind of like an index. You can use that list to navigate to a particular question that interests you.
Who wore this dress, and for what occasion? (wearer)
What year was the dress made and worn? (period)
What region is the dress from? (region)
Where was it purchased / made? (source)
What underwear would have been worn with this dress? (underwear)
What accessories would have been worn with this dress? (accessories)
Who made this dress, and under what conditions? (production)
Was the dress made to order, or ready to wear, or something in between? (production)
What construction techniques were used to make this dress? (construction)
What would the flat pattern for the dress look like? (pattern)
Has the dress been altered since its original creation? (construction)
How much did this dress cost? (cost)
How much were workers paid to make it? (cost)
What are the different fabrics, trims, and hardware used in the dress? (materials)
Where were they produced, under what conditions, and at what cost? (materials)
Where can we find similar fabrics, trims, and hardware to reproduce the dress? (materials)
How can we work with this dress without causing it further damage? (conservation)
What size person originally wore this dress? (size)
To what size should we reproduce the dress? (size)
What would the dress have looked like in 3D? In motion? (images)
Each of these questions has several "sub-questions," and we will try to address each question in at least one blog post. You can navigate through our blog posts chronologically, or use the "Label" list as an index to go right to the sections that interest you most. If you would like to add any questions, or help propose some answers, please add to the comments below (or on the pages for individual questions).
1st Object Chosen
After careful consideration, we have chosen our first object to reproduce. This gown, with accession number 1992.035 in our collection, is well loved by the students who have previosuly seen it on display. It is somewhat fragile, which means that we have to be very careful with it, but the way that it is deteriorating inspires us even more to fully research and reproduce it before the deterioration progresses much further. We believe it to be from about 1910-1915; further research should confirm that. The dress has a label which reads "Franklin Simon & Co. / Fifth Avenue, New York."
Here is a slideshow of images of the dress.
Thanks to volunteer Lydia Palmiotti for helping to mount the dress and take photos of it.
Use your mouse to roll over the bottom of the slideshow viewer so that you can stop the slides and move forward or backward through them at your own pace. Also you can view the photos and slideshow in our Picasa Web Album if you click here.
Object Selection Criteria
Our first task with this project is to choose which objects from the collection we will reproduce.
Our criteria for selection are:
attractive on a larger figure
involves construction that is neither too complicated to be difficult nor too simple to be boring
fills in a period of history that is currently not well represented in our collection of reproductions
attractive to a modern, young eye
not too fragile to be handled for the patterning process
creates a silhouette that is different from our current silhouette, with shaping undergarments
The final selections will be made by Holly Hummel and Arden Kirkland, but we have consulted with some of our students for a perspective closer to that of the students who will take part in the activity. Thank you to Lydia Palmiotti, a high school student from Poughkeepsie, who has volunteered with this project, and looked through the entire database of our collection to help with the selection process.
Example of a visit: "Fashion and the Feminine"
As an example of what students experience when we host a class visit, here is a slideshow from a recent event. "Women's Studies: Fashion and the Feminine," taught by Susan Hiner, visited the Vassar College Costume Collection on October 10, 2007.
Use your mouse to roll over the bottom of the slideshow viewer so that you can stop the slides and move forward or backward through them at your own pace. Also you can view the photos and slideshow in our Picasa Web Album if you click here.
Use your mouse to roll over the bottom of the slideshow viewer so that you can stop the slides and move forward or backward through them at your own pace. Also you can view the photos and slideshow in our Picasa Web Album if you click here.
How to use this blog
The nature of blogs is that it is easiest to navigate through blog posts in reverse chronological order. However, here you have some other options:
-To view all the posts in order, start at the "Welcome" post, then click on "newer post" after reading each one.
-To view my favorite highlighted posts, select "Highlights" from the top left sidebar (or from the label choices); scroll down to the bottom and then work your way up if you want to read in chronological order
-Or use the "Label" list as an index to go right to the sections that interest you most.
-Or use the "Search" box to search for other words
If you would like to add any questions, or help propose some answers, please use the comment feature to do so!
With most images on these pages, you can click on the image to see it larger in Picasa or Flickr, or click on the title below to see the whole "album" of photos it comes from. Just use your "back" button in your browser to get back here when you're done.
For most slideshows (made in Picasa), use your mouse to roll over the bottom of the slideshow viewer so that you can stop the slides and move forward or backward through them at your own pace. Also you can view the photos and slideshow in our Picasa Web Album if you click here.
Other slideshows are made in Flickr. To view one, click on the arrow (play button) for it to start playing. You can also click on the icon in the bottom right hand corner for a fullscreen view - and then, to get out of it, press the "esc" key. Within the viewer, use the arrows, pause button, and lightbox at the bottom to navigate through the images.
If you have any problems viewing this blog, please either leave a comment to reply to this post, or email me.
Welcome to the Vassar College Costume Collection's "Trying on History" Project!
This blog will chronicle our "Trying on History" project, and all our related work.
A visit to the Vassar College Costume Collection (VCCC) provides an exciting way for students to have a hands-on experience of history, not only through the ability to view a variety of clothing objects from different historic periods, but also through the kinetic experience of trying on reproductions of such clothing.
In recent years, many different groups, both Vassar classes and community groups, have made field trips to visit the VCCC. The focus for such visits is on the changing shape of fashion, and students are shown full garments on mannequins along with some of the actual bustles, hoops, and other undergarments that accompanied each change in shape. The historic objects are far too fragile to be tried on, but students are able to try on a selection of theatrical costume reproductions, especially corsets, hoops, bustles, and petticoats and the daywear that would be worn with them.
We have recently received funding from the Carolyn Grant '36 Endowment at Vassar for a new phase of this project: to provide for the construction of new reproduction garments to fit a wider range of sizes. This will also create an opportunity to create a stronger connection between the reproductions and the historic objects by reproducing objects from the collection, creating copies that are true to the original in all aspects except size, and can be experienced in motion.
Not only will these reproductions be tried on by physical visitors to the collection for years to come, but they will also be shared with virtual visitors to our eventual website. For now, this blog will serve as our link to the public. Here you will find information about our research, conservation, and construction techniques, and see some footage from our classroom visits. Enjoy your visit, and please share your comments!
Subscribe to:
Posts (Atom)