


Today I had the assistance of the lovely Miss Lydia Palmiotti, a Poughkeepsie area high school student who has offered to volunteer on this project.
The first thing I asked Lydia to do was to steam the dress. I am hoping that a little steam will help to refresh the fibers of the dress and reduce their brittle nature. With the dress laid out on the table, she carefully inched the steam over the entire dress, working in rows up and down, then over. It is tricky to use the steamer with something flat on the table, as it is designed to work with a hanging garment. She had to keep a careful eye out for condensation on the head of the steamer, and wipe any drips onto a clean white towel before they landed on the garment.
Next Lydia helped to take several basic measurements of the dress, to determine the basic size of the original wearer, and therefore what size mannequin to put it on. Her waist measures about 21"; underbust 25.5"; bust 34.75"; skirt side length 42". This is smaller than any of our commercial dress forms, but luckily we have an alternative. In the mid-90's we mounted a few exhibitions and included several objects that were too small for our dress forms. To show these objects, students helped to build special mannequins to size. We located one such mannequin that was small enough, and brought it into our workspace, then put a slip over it (to protect the dress from the uncovered wood on the mannequin), and laid tissue paper on the floor around the base (to protect the dress from touching the floor).
Then we were ready to mount the dress. While one of us held the bodice of the skirt (by the bust area, as the sleeves are too delicate), the other held the skirt, carefully opening the skirt and putting it over top of the mannequin, then lowering the dress down into place. One problem with our historic mannequins is that they don't have proper shoulders. In this case, the dress was longer waisted than our tiny mannequin, so we had to build up the shoulders with tissue paper for the dress bodice to hang better. Even so, I believe the bodice bloused over the waist sash a little more than it would have for its original wearer. Also, even on this tiny mannequin, it put too much stress on the fabric to hook the original closures at the waist. Instead, I carefully pinned the bodice overlap with fine silk pins. I also pinned the coral trim on the waist sash in a few places that it was torn off and dangling (several of these bits have since come off entirely). After all this, the dress was also a little long for the mannequin, and fanned out on the floor about 2.5". It is likely that the hem hit just above floor length on the original wearer, who must have been about 3" taller than our mannequin.
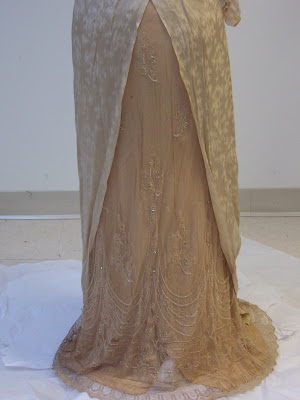 |
| From 1910's Franklin Simon Gown |
With the dress properly mounted, it provided a wonderful opportunity to record what it is really like in 3 dimensions. In the next entry you'll find more sketches and photographs of the dress on the mannequin.
Her time in 3D was limited, though. As helpful as it was to see her on the mannequin, it was not safe to expose her to the force of gravity for too long, especially considering the weight of the beadwork on the lace skirt layer. At the end of our workday, I was helped by a Vassar student, Emily Liemkuhler '10, to carefully take the dress off of the mannequin, and put her back in her muslin cover - "tucking her in for the night," as we've come to see it.
No comments:
Post a Comment