

 Posts
Posts


What construction techniques were used to make this dress?
We've made a lot of progress, and the reproduction is almost done. Take a look at this slideshow, showing many of the steps along the way (and many students helping out).
A great deal of credit goes out to the following students for their hard work to actually put the reproduction together:
Emily Riehl-Bedford (many parts of the bodice - and she was the one who stuck around after finals to help put it all together!)
Jessica Barksdale (skirt)
Chloe Boxer (bodice)
Elisabeth Watson (overskirt and overlays, lace skirt)
Emily Leimkuhler (lace skirt)
Danielle Morvant (pleated sash)
Margaret Dwyer (cutting out parts of the bodice)
Sharon Scoble (lace skirt)
Emily Antenucci (sleeves)
(If I'm forgetting anything or anyone, just let me know and I'll edit!)
Showing posts with label construction. Show all posts
Showing posts with label construction. Show all posts
Monday, June 1, 2009


Monday, May 4, 2009
Cutting and Draping the Lace Skirt
What construction techniques were used to make this dress?
Here's a slideshow showing the steps to build the lace skirt of the reproduction.
Here's a slideshow showing the steps to build the lace skirt of the reproduction.
Tuesday, April 14, 2009
Construction Order of the Original
What construction techniques were used to make this dress?
After carefully studying the construction details of the original dress, I think I've figured out the steps taken to put it together. Here's a slideshow with some detailed images:
For our construction steps on the reproduction, I've made a few changes to incorporate some modern conveniences, like serging raw edges.
To view a table with the details, go to:
After carefully studying the construction details of the original dress, I think I've figured out the steps taken to put it together. Here's a slideshow with some detailed images:
For our construction steps on the reproduction, I've made a few changes to incorporate some modern conveniences, like serging raw edges.
To view a table with the details, go to:
Friday, January 9, 2009
Mockup Fitting
What would the flat pattern for the dress look like?
What would the dress have looked like in 3D? In motion?
We finally had a mockup fitting to try out the pattern of the enhanced size reproduction!
Here's a slideshow from the fitting.I'm trying out the slideshow feature from Flickr - if it doesn't show up, please try a different browser. Click on the arrow (play button) for it to start playing. You can also click on the icon in the bottom right hand corner for a fullscreen view - and then, to get out of it, press the "esc" key.
The fitting went amazingly well, with only a few minor alterations. I'm patting myself on the back for my draping!
What would the dress have looked like in 3D? In motion?
We finally had a mockup fitting to try out the pattern of the enhanced size reproduction!
Here's a slideshow from the fitting.I'm trying out the slideshow feature from Flickr - if it doesn't show up, please try a different browser. Click on the arrow (play button) for it to start playing. You can also click on the icon in the bottom right hand corner for a fullscreen view - and then, to get out of it, press the "esc" key.
The fitting went amazingly well, with only a few minor alterations. I'm patting myself on the back for my draping!
Wednesday, September 24, 2008
Mannequin switch
Well, we knew that even the child sized mannequin was slightly too big for our dress, but I thought we could still work with it. Turns out we're doing so much of the patterning by draping now, that it really makes too much of a difference. So, we have returned to the mannequin we used to mount the dress for photographs early in the process. This is still a bit problematic, as this is a mannequin we made ourselves years ago, and it doesn't have much structure. I've added many shoulder pads (it didn't really have defined shoulders to begin with) and stabilized the shape as much as possible. Also, it's shorter than the original, so I still have to remember to account for that.
Wednesday, September 3, 2008
Lace Skirt Pattern
Here's an overview of the entire process to get the pattern of the lace skirt layer.
What would the flat pattern for the dress look like?
On August 18, Emily Leimkuhler (VC '10) began working on patterning the lace skirt layer. She started by measuring the hem circumference. In the process, whereas I had thought that the lace skirt was in one piece with one seam, she found an additional seam very cleverly hidden in the design of the lace. The skirt is in 2 sections, one of which is 46" wide at the hem; the other is 18.5", for a total hem circumference of 64.5". The main seam is a French seam at the center back, but the other seam is very well hidden, with the two edges simply overlapped and stitched to carefully follow the pattern of the lace.
Next, she cut, pressed, and blocked a large piece of muslin to prepare to make a rub off of the lace skirt, especially showing the pattern of the beadwork.
She also began basting a "grainline" into the lace - identifying a vertical pattern in the lace and following it with a thread basting line. This will be used as a landmark point to pin the muslin over and rub off the beadwork design.
Emily's next day working on this was August 27th.
Here Emily was carefully placing muslin over a section of the lace skirt, and pinning it in place to be completely smooth. It was very delicate, time-consuming work.
Once the muslin was all in place, she was able to carefully run a piece of chalk over it, registering not only the design of the beaded lace underneath, but also the shape of the pattern piece, and placement of seams, for the lace skirt.
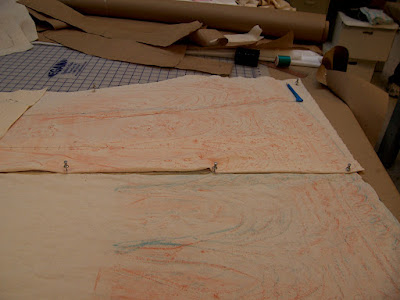
Once all the pieces were rubbed-off, we were able to lay out the flat pieces on the table and true them up, pinning them edge to edge at one of the seams.
As Emily's rub-off process couldn't easily reach up to the waistline of the dress, the upper edge at this stage was still somewhat unknown. We solved that by using the gridding technique to measure out the shape of the upper edge, including the horizontal tuck that falls just below the waistline (hidden by the overskirt). Emily drew some gridlines onto the muslin, along the waistline. Then we used landmarks in the embroidered lace (as noted in the rub-off), along with the threadlines Emily had previously basted into the lace, to delineate an axis that we could measure out from. As I worked with the original garment, measuring over and up from each landmark point the the next, Emily measured and marked each point on the muslin. The resulting pattern is remarkably accurate.
What would the flat pattern for the dress look like?
On August 18, Emily Leimkuhler (VC '10) began working on patterning the lace skirt layer. She started by measuring the hem circumference. In the process, whereas I had thought that the lace skirt was in one piece with one seam, she found an additional seam very cleverly hidden in the design of the lace. The skirt is in 2 sections, one of which is 46" wide at the hem; the other is 18.5", for a total hem circumference of 64.5". The main seam is a French seam at the center back, but the other seam is very well hidden, with the two edges simply overlapped and stitched to carefully follow the pattern of the lace.
Next, she cut, pressed, and blocked a large piece of muslin to prepare to make a rub off of the lace skirt, especially showing the pattern of the beadwork.
She also began basting a "grainline" into the lace - identifying a vertical pattern in the lace and following it with a thread basting line. This will be used as a landmark point to pin the muslin over and rub off the beadwork design.
Emily's next day working on this was August 27th.
Here Emily was carefully placing muslin over a section of the lace skirt, and pinning it in place to be completely smooth. It was very delicate, time-consuming work.
 |
| From Lace Skirt Rub-off |
Once the muslin was all in place, she was able to carefully run a piece of chalk over it, registering not only the design of the beaded lace underneath, but also the shape of the pattern piece, and placement of seams, for the lace skirt.
 |
| From Lace Skirt Rub-off |
 |
| From Lace Skirt Rub-off |
Once all the pieces were rubbed-off, we were able to lay out the flat pieces on the table and true them up, pinning them edge to edge at one of the seams.
 |
| From Lace Skirt Rub-off |
 |
| From Lace Skirt Rub-off |
 |
| From Lace Skirt Rub-off |
As Emily's rub-off process couldn't easily reach up to the waistline of the dress, the upper edge at this stage was still somewhat unknown. We solved that by using the gridding technique to measure out the shape of the upper edge, including the horizontal tuck that falls just below the waistline (hidden by the overskirt). Emily drew some gridlines onto the muslin, along the waistline. Then we used landmarks in the embroidered lace (as noted in the rub-off), along with the threadlines Emily had previously basted into the lace, to delineate an axis that we could measure out from. As I worked with the original garment, measuring over and up from each landmark point the the next, Emily measured and marked each point on the muslin. The resulting pattern is remarkably accurate.
 |
| From Lace Skirt Rub-off |
Thursday, August 28, 2008
Starting to drape - original size
What would the flat pattern for the dress look like?
Now that we have an appropriately sized mannequin, we can start working on the original size pattern.
Beginning to drape the original size pattern, with the reproduction size draping in the background.
The first piece to capture is the inner waistband. I thought it would be simple to measure out the placement of darts sewn into this grosgrain ribbon, and I had Emily and Lydia work on measuring that out. It turned out to be much harder than we thought, however, so after they left I took it on myself. The complication is that the darts are not on the straight grain of the ribbon, but at angles. The best solution was to use a modified rub-off technique, and shape a piece of muslin over it to find the exact placement of the darts.
The darts at the side seams imply to me that the dress was made for a slightly larger size, but taken in for our smaller wearer.
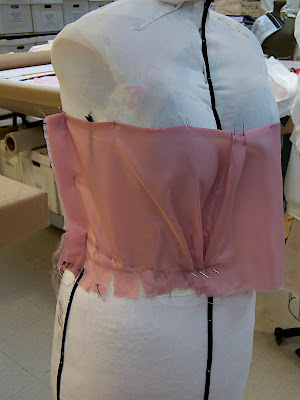
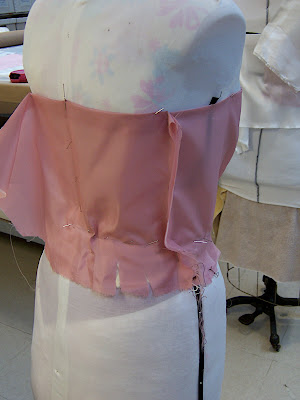
The next pieces are the bodice lining pieces, front and back.
If the top edge seems a little low on the bustline, it's because the proportions of our smaller mannequin are still a little off, since it started as a child's size. We're working not only off the mannequin, but also off of the measurements of the dress itself, which of course are more accurate than the mannequin shape.
Next, I had Lydia skip ahead a layer to measure the lace pieces that go over the shoulders.
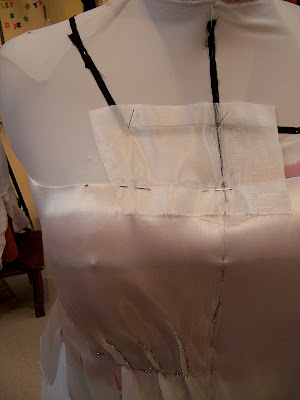
I also took a gentle rub-off of the lace inset piece at the top center front of the bodice. Then I took this shape to size up proportionately on my reproduction size.
Meanwhile, Lydia took a rub-off of the shape of the decorative fabric-covered buckle on the back of the overskirt.
To end her workday, I had Lydia transfer some of our completed pattern pieces to paper, using a pounce wheel, pushpins, pencil, ruler, and French curve.
Now that we have an appropriately sized mannequin, we can start working on the original size pattern.
 |
| From Research Process Part 1 - 1910's Franklin Simon gown |
The first piece to capture is the inner waistband. I thought it would be simple to measure out the placement of darts sewn into this grosgrain ribbon, and I had Emily and Lydia work on measuring that out. It turned out to be much harder than we thought, however, so after they left I took it on myself. The complication is that the darts are not on the straight grain of the ribbon, but at angles. The best solution was to use a modified rub-off technique, and shape a piece of muslin over it to find the exact placement of the darts.
 |
| From Research Process Part 1 - 1910's Franklin Simon gown |
The darts at the side seams imply to me that the dress was made for a slightly larger size, but taken in for our smaller wearer.
The next pieces are the bodice lining pieces, front and back.
 |
| From Research Process Part 1 - 1910's Franklin Simon gown |
 |
| From Research Process Part 1 - 1910's Franklin Simon gown |
If the top edge seems a little low on the bustline, it's because the proportions of our smaller mannequin are still a little off, since it started as a child's size. We're working not only off the mannequin, but also off of the measurements of the dress itself, which of course are more accurate than the mannequin shape.
Next, I had Lydia skip ahead a layer to measure the lace pieces that go over the shoulders.
 |
| From Research Process Part 1 - 1910's Franklin Simon gown |
I also took a gentle rub-off of the lace inset piece at the top center front of the bodice. Then I took this shape to size up proportionately on my reproduction size.
 |
| From Research Process Part 1 - 1910's Franklin Simon gown |
Meanwhile, Lydia took a rub-off of the shape of the decorative fabric-covered buckle on the back of the overskirt.
To end her workday, I had Lydia transfer some of our completed pattern pieces to paper, using a pounce wheel, pushpins, pencil, ruler, and French curve.
 |
| From Research Process Part 1 - 1910's Franklin Simon gown |
Monday, August 18, 2008
Starting to drape - reproduction size
What would the flat pattern for the dress look like?
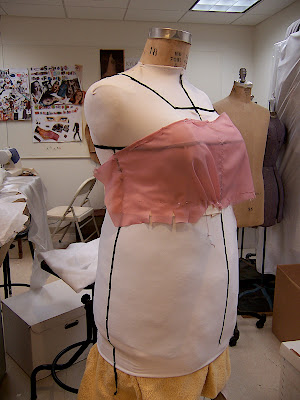
Now that we have a mannequin in the size we want our reproduction to be, I can start working on draping that pattern.
I could have concentrated on the pattern in the original size and graded it up (grading is the process by which you systematically make a pattern bigger), but my concern was that the proportions would be so different in such a different size, and for a modern body, that the pattern would be ill-fitting. Also, this way I can work on the 2 patterns in 2 sizes simultaneously, so perhaps we can get our reproduction done sooner. In fact, I don't even have a mannequin here that is small enough to drape the original size, but I have access to a child's mannequin that I will bring in soon. Working with the 2 different bodies in 3D will be very helpful to figure out the nuances of the pattern pieces.
I'll be working from the inside out to drape the dress, layering each piece on top of what's below. So, I've begun with the inner waistband, and then worked on the bodice lining pieces.
The next layer is what I refer to as the "bodice band" - on the original dress it is a strip of off-white satin with edges finished in such a way that I believe it is simply a very wide satin ribbon. It encircles the whole bodice, with a closure at the center back, and has very little shaping (just a few small pleats at the front).
Now that we have a mannequin in the size we want our reproduction to be, I can start working on draping that pattern.
I could have concentrated on the pattern in the original size and graded it up (grading is the process by which you systematically make a pattern bigger), but my concern was that the proportions would be so different in such a different size, and for a modern body, that the pattern would be ill-fitting. Also, this way I can work on the 2 patterns in 2 sizes simultaneously, so perhaps we can get our reproduction done sooner. In fact, I don't even have a mannequin here that is small enough to drape the original size, but I have access to a child's mannequin that I will bring in soon. Working with the 2 different bodies in 3D will be very helpful to figure out the nuances of the pattern pieces.
I'll be working from the inside out to drape the dress, layering each piece on top of what's below. So, I've begun with the inner waistband, and then worked on the bodice lining pieces.
 |
| From Research Process Part 1 - 1910's Franklin Simon gown |
The next layer is what I refer to as the "bodice band" - on the original dress it is a strip of off-white satin with edges finished in such a way that I believe it is simply a very wide satin ribbon. It encircles the whole bodice, with a closure at the center back, and has very little shaping (just a few small pleats at the front).
 |
| From Research Process Part 1 - 1910's Franklin Simon gown |
 |
| From Research Process Part 1 - 1910's Franklin Simon gown |
Wednesday, August 6, 2008
First pattern piece
What would the flat pattern for the dress look like?
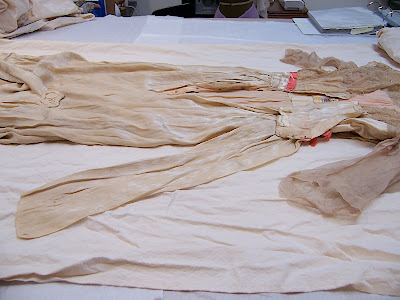
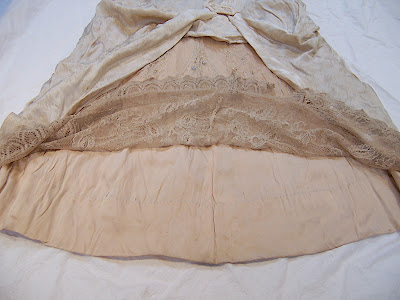
To end my session today, I wanted to capture at least one pattern piece. I decided to start with something really simple (or so I thought): the hem facing at the center front hem of the skirt, which creates a curved slit in the front. I thought this piece was a good candidate to be copied with the rub-off technique, as it was fairly small and flat, but with pronounced edges.
-I started by laying the dress front down,
 |
| From Research Process Part 1 - 1910's Franklin Simon gown |
carefully turning back the lace skirt layer,
 |
| From Research Process Part 1 - 1910's Franklin Simon gown |
and then turning back the back skirt lining to reveal the inside of the front skirt lining.
 |
| From Research Process Part 1 - 1910's Franklin Simon gown |
-Then I began to stitch a basting line to follow the grain of the fabric. Many of the fabrics of this dress have become stretched and misshapen over the years, making it necessary to mark not only the lengthwise grain, but instead an axis that includes the crosswise grain as well. When doing this, they don't form the proper right angle they should, and need to be gently manipulated back into that right angle if the original pattern shape is to be found. I got out my magnifying lamp and settled in to find that grain.
 |
| From Research Process Part 1 - 1910's Franklin Simon gown |
-It wasn't until I started to place these basting lines that I became aware of just how brittle the skirt lining is. Usually the basting does not present a danger to the garment if done delicately with a very fine needle. In this case, however, I found that the insertion of the needle was enough to make the silk shatter, resulting in a small vertical tear. I continued, but very carefully.
-Then I measured the overall size of the pattern piece and cut a piece of washed muslin several inches larger in both directions.
-I measured the placement of my thread basted axis, and marked lines in pencil on the muslin to indicate it.
-I gently placed my muslin over my hem facing, and pinned the pencil lines to the thread basting lines with a few very fine silk pins.
-Next I smoothed the muslin out to the edges of the hem facing piece, pinning them flat around the edges
-With chalk, I was able to rub over the seams and edges of the facing.
-With everything marked, I unpinned the muslin.
-Finally I trued up the lines on the muslin with a pencil, ruler, and French curve.
1 pattern piece completed! (out of 25)
Beginning to pattern
What would the flat pattern for the dress look like?
From Research Process Part 1 - 1910's Franklin Simon gown
I started by making a list of all the different pattern pieces that would be needed to reproduce the gown, from the top down and outside in:
1. bodice shoulder lace pieces (2)
2. center front bodice lace inset
3. sleeve (2)
4. bodice band
4.5. net trim
5. front asymmetrical bodice overlay
5.5 net trim
6. back asymmetrical bodice overlay
6.5. seam binding on back overlay closure
7. front bodice chiffon lining (2)
8. back bodice chiffon lining (2)
9. front bodice lining
10. back bodice lining
11. grosgrain inner waistband
12. seam tape (2)
13. pleated sash
14. sash trim
15. back hanging piece
16. overskirt
17. lace skirt layer (main piece)
17.5. lace skirt layer (smaller piece)
18. back skirt lining (2)
19. front skirt lining
19.5. skirt placket
20. front skirt hem lining facing
As you can see, the more we work with the dress, the more we find things are not as they appeared at first glance. Where pattern pieces are labeled with a .5, they have been added in after we thought the list was done!
This brings us to a grand total of 25 pattern pieces.
Tuesday, July 29, 2008
Alterations?
Has the dress been altered since its original creation?
 |
| From Research Process Part 1 - 1910's Franklin Simon gown |
There is a tuck in the lace layer of the skirt, just below the waist level, all the way around, which is hidden by the jacquard overlay. It is not quite even all the way around. Was it original on the dress, providing some sort of shaping to the skirt? Or is it a later alteration?
One other detail suggests that it might be an alteration: on the snap closure placket at the center back of the skirt, the lace layer sits higher than the lining layer. The lining could easily have been re-hemmed right at the bottom to adjust the length, but the lace, with its border design and beading, would have to have been raised at the waist (and is conveniently covered by the overskirt).
Another detail I've considered is the nature of the beading. The beadwork continues up the length of the lace skirt, even though much of it is covered by the overskirt. I thought this also might be an argument for an alteration, but in fact I now think it just indicates that the lace was beaded as yardage before being cut into the skirt.
Was the dress made to order, or ready to wear, or something in between?
Another option exists, somewhere in the middle - that the dress was in the middle of the spectrum between ready-to-wear and made-to-order, so that parts of the dress (inner waistband, lining, skirt) and were already made, but then altered for the specific wearer, whereas other parts (sash, overlays) were applied for the specific wearer. Then it would make sense that the skirt length was altered, even for its original wearer (not unlike a modern bridesmaid's dress).
Sunday, July 27, 2008
Questions
The more we work with this dress, the more we want to know about it. As we go, we keep adding to a list of questions we have about the dress and its history, and our objective with this project is to answer as many of them as we can! That way a student who tries on the reproduction can get a detailed picture of the world from which the dress came.
What follows are our questions, in no particular order, followed by a label in parentheses which indicates the category this question falls under. From each blog page, the sidebar on the left has a list of all these categories, kind of like an index. You can use that list to navigate to a particular question that interests you.
Who wore this dress, and for what occasion? (wearer)
What year was the dress made and worn? (period)
What region is the dress from? (region)
Where was it purchased / made? (source)
What underwear would have been worn with this dress? (underwear)
What accessories would have been worn with this dress? (accessories)
Who made this dress, and under what conditions? (production)
Was the dress made to order, or ready to wear, or something in between? (production)
What construction techniques were used to make this dress? (construction)
What would the flat pattern for the dress look like? (pattern)
Has the dress been altered since its original creation? (construction)
How much did this dress cost? (cost)
How much were workers paid to make it? (cost)
What are the different fabrics, trims, and hardware used in the dress? (materials)
Where were they produced, under what conditions, and at what cost? (materials)
Where can we find similar fabrics, trims, and hardware to reproduce the dress? (materials)
How can we work with this dress without causing it further damage? (conservation)
What size person originally wore this dress? (size)
To what size should we reproduce the dress? (size)
What would the dress have looked like in 3D? In motion? (images)
Each of these questions has several "sub-questions," and we will try to address each question in at least one blog post. You can navigate through our blog posts chronologically, or use the "Label" list as an index to go right to the sections that interest you most. If you would like to add any questions, or help propose some answers, please add to the comments below (or on the pages for individual questions).
What follows are our questions, in no particular order, followed by a label in parentheses which indicates the category this question falls under. From each blog page, the sidebar on the left has a list of all these categories, kind of like an index. You can use that list to navigate to a particular question that interests you.
Who wore this dress, and for what occasion? (wearer)
What year was the dress made and worn? (period)
What region is the dress from? (region)
Where was it purchased / made? (source)
What underwear would have been worn with this dress? (underwear)
What accessories would have been worn with this dress? (accessories)
Who made this dress, and under what conditions? (production)
Was the dress made to order, or ready to wear, or something in between? (production)
What construction techniques were used to make this dress? (construction)
What would the flat pattern for the dress look like? (pattern)
Has the dress been altered since its original creation? (construction)
How much did this dress cost? (cost)
How much were workers paid to make it? (cost)
What are the different fabrics, trims, and hardware used in the dress? (materials)
Where were they produced, under what conditions, and at what cost? (materials)
Where can we find similar fabrics, trims, and hardware to reproduce the dress? (materials)
How can we work with this dress without causing it further damage? (conservation)
What size person originally wore this dress? (size)
To what size should we reproduce the dress? (size)
What would the dress have looked like in 3D? In motion? (images)
Each of these questions has several "sub-questions," and we will try to address each question in at least one blog post. You can navigate through our blog posts chronologically, or use the "Label" list as an index to go right to the sections that interest you most. If you would like to add any questions, or help propose some answers, please add to the comments below (or on the pages for individual questions).
Subscribe to:
Posts (Atom)