


Wednesday, September 24, 2008
Mannequin switch
Well, we knew that even the child sized mannequin was slightly too big for our dress, but I thought we could still work with it. Turns out we're doing so much of the patterning by draping now, that it really makes too much of a difference. So, we have returned to the mannequin we used to mount the dress for photographs early in the process. This is still a bit problematic, as this is a mannequin we made ourselves years ago, and it doesn't have much structure. I've added many shoulder pads (it didn't really have defined shoulders to begin with) and stabilized the shape as much as possible. Also, it's shorter than the original, so I still have to remember to account for that.
Sunday, September 7, 2008
Tech problems
If you have trouble viewing the images or slideshows, please try a different browser. If you continue to have problems, please leave a comment below - I'll get an email when you do, and then I can try to fix it. Also, please try again later! Sometimes the problem is just temporary and unexplained.
Wednesday, September 3, 2008
Lace Skirt Pattern
Here's an overview of the entire process to get the pattern of the lace skirt layer.
What would the flat pattern for the dress look like?
On August 18, Emily Leimkuhler (VC '10) began working on patterning the lace skirt layer. She started by measuring the hem circumference. In the process, whereas I had thought that the lace skirt was in one piece with one seam, she found an additional seam very cleverly hidden in the design of the lace. The skirt is in 2 sections, one of which is 46" wide at the hem; the other is 18.5", for a total hem circumference of 64.5". The main seam is a French seam at the center back, but the other seam is very well hidden, with the two edges simply overlapped and stitched to carefully follow the pattern of the lace.
Next, she cut, pressed, and blocked a large piece of muslin to prepare to make a rub off of the lace skirt, especially showing the pattern of the beadwork.
She also began basting a "grainline" into the lace - identifying a vertical pattern in the lace and following it with a thread basting line. This will be used as a landmark point to pin the muslin over and rub off the beadwork design.
Emily's next day working on this was August 27th.
Here Emily was carefully placing muslin over a section of the lace skirt, and pinning it in place to be completely smooth. It was very delicate, time-consuming work.
Once the muslin was all in place, she was able to carefully run a piece of chalk over it, registering not only the design of the beaded lace underneath, but also the shape of the pattern piece, and placement of seams, for the lace skirt.
Once all the pieces were rubbed-off, we were able to lay out the flat pieces on the table and true them up, pinning them edge to edge at one of the seams.
As Emily's rub-off process couldn't easily reach up to the waistline of the dress, the upper edge at this stage was still somewhat unknown. We solved that by using the gridding technique to measure out the shape of the upper edge, including the horizontal tuck that falls just below the waistline (hidden by the overskirt). Emily drew some gridlines onto the muslin, along the waistline. Then we used landmarks in the embroidered lace (as noted in the rub-off), along with the threadlines Emily had previously basted into the lace, to delineate an axis that we could measure out from. As I worked with the original garment, measuring over and up from each landmark point the the next, Emily measured and marked each point on the muslin. The resulting pattern is remarkably accurate.
What would the flat pattern for the dress look like?
On August 18, Emily Leimkuhler (VC '10) began working on patterning the lace skirt layer. She started by measuring the hem circumference. In the process, whereas I had thought that the lace skirt was in one piece with one seam, she found an additional seam very cleverly hidden in the design of the lace. The skirt is in 2 sections, one of which is 46" wide at the hem; the other is 18.5", for a total hem circumference of 64.5". The main seam is a French seam at the center back, but the other seam is very well hidden, with the two edges simply overlapped and stitched to carefully follow the pattern of the lace.
Next, she cut, pressed, and blocked a large piece of muslin to prepare to make a rub off of the lace skirt, especially showing the pattern of the beadwork.
She also began basting a "grainline" into the lace - identifying a vertical pattern in the lace and following it with a thread basting line. This will be used as a landmark point to pin the muslin over and rub off the beadwork design.
Emily's next day working on this was August 27th.
Here Emily was carefully placing muslin over a section of the lace skirt, and pinning it in place to be completely smooth. It was very delicate, time-consuming work.
 |
| From Lace Skirt Rub-off |
Once the muslin was all in place, she was able to carefully run a piece of chalk over it, registering not only the design of the beaded lace underneath, but also the shape of the pattern piece, and placement of seams, for the lace skirt.
 |
| From Lace Skirt Rub-off |
 |
| From Lace Skirt Rub-off |
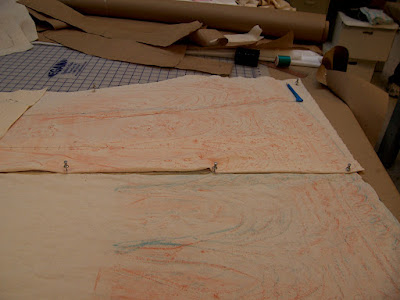
Once all the pieces were rubbed-off, we were able to lay out the flat pieces on the table and true them up, pinning them edge to edge at one of the seams.
 |
| From Lace Skirt Rub-off |
 |
| From Lace Skirt Rub-off |
 |
| From Lace Skirt Rub-off |
As Emily's rub-off process couldn't easily reach up to the waistline of the dress, the upper edge at this stage was still somewhat unknown. We solved that by using the gridding technique to measure out the shape of the upper edge, including the horizontal tuck that falls just below the waistline (hidden by the overskirt). Emily drew some gridlines onto the muslin, along the waistline. Then we used landmarks in the embroidered lace (as noted in the rub-off), along with the threadlines Emily had previously basted into the lace, to delineate an axis that we could measure out from. As I worked with the original garment, measuring over and up from each landmark point the the next, Emily measured and marked each point on the muslin. The resulting pattern is remarkably accurate.
 |
| From Lace Skirt Rub-off |
Tuesday, September 2, 2008
Shoulder Lace Pieces
Today we worked on the pattern of the shoulder lace pieces, which were easy to pattern by simple measurements, since they are essentially based off a rectangle, with angled ends as they attach to the bodice.
Translating into the enhanced size figure is trickier, though - if we were to use lace of the same width as the original (8.75" wide) then the fit over the bust falls differently, and doesn't come as close to meeting on the sides.
Taking into account the different proportions, it might be helpful to find a slightly wider lace - but if not, we just have to take this into account in terms of where the lines fall.
Subscribe to:
Posts (Atom)